

Adorable Mother’s Day Craft Ideas with @craftingafunlife
The most special holiday of the year comes up in May: Mother’s Day! Whether you are celebrating a mother, grandmother, aunt or any special woman in your life who holds this role, here are some ideas for tiny hands to create a heartfelt gift.
Related:
- The Best Restaurants in Tampa Bay with Curated Menus for Mother's Day Brunch 2025
- Mother's Day Flower Workshops and Make-Your-Own Bouquets
- Mother's Day Freebies and Deals in Tampa Bay for 2025
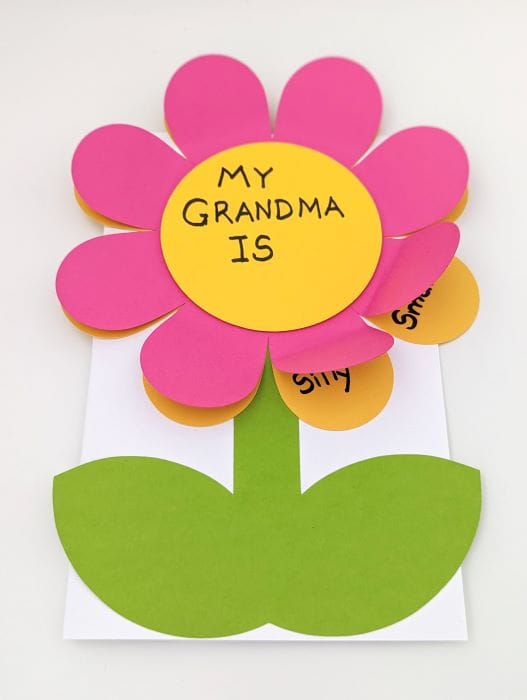
Flower Message Mother’s Day Card
Supplies:
- Colorful cardstock
- Scissors
- Flower template (available on com)
- Black permanent marker
- Glue
- Alphabet stickers
- Markers or crayons
Directions:
- First, download the printable flower template; then, cut out all the
- Next, kids can write short messages or words to describe their mom, grandma, aunt or caregiver on the petals of one of the flower templates.
- Fold a white cardstock in half to create your
- Glue the stem with leaves to the bottom of your
- Use glue to stick the flower with the handwritten message on top of the
- Apply a small amount of glue to the center of this flower, and then stick the second flower on top. Write “My Mom is, My Grandma is… or My Aunt is…” in the middle of the top
- Finally, use stickers or a black permanent marker to write a message inside of the Mother’s Day card.
Shrinky Dink Keychain
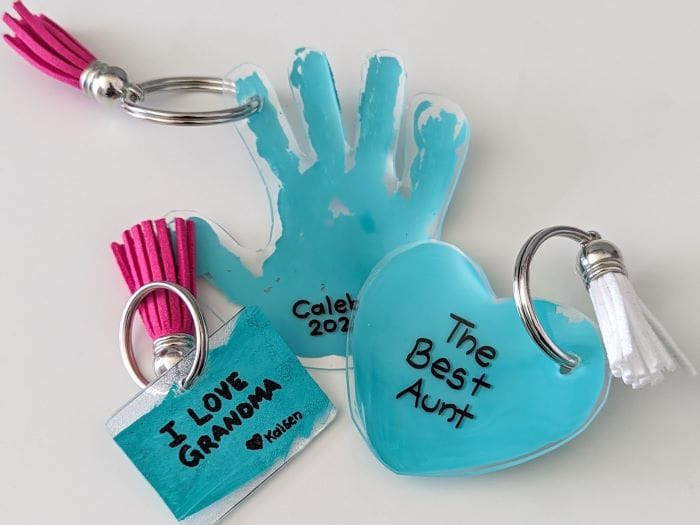
Supplies:
- Shrinky dink clear sheets
- Colored permanent markers
- Gloss acrylic paint
- Paintbrush
- Scissors
- Mod podge
- 25mm split rings
- Hole puncher
- Keychain tassel
- Parchment paper
Directions:
- First, use gloss acrylic paint or permanent markers to decorate your Shrinky Dink
- Next, set the painted sheet aside and allow it to Then write your child’s name and year or sweet message on the back of the sheet.
- Add a hole punch where you want your keychain to Make sure you complete this step before adding the sheet to the oven.
- Place parchment paper on a baking sheet then add your Shrinky Dink craft. You can place another piece of parchment paper on top of the craft to stop it from Make sure to place the paint side up in the oven. Follow the directions on the package for heating instructions.
- Apply mod podge on the side of the paint to protect it from
Mother's Day Handprint Bouquet
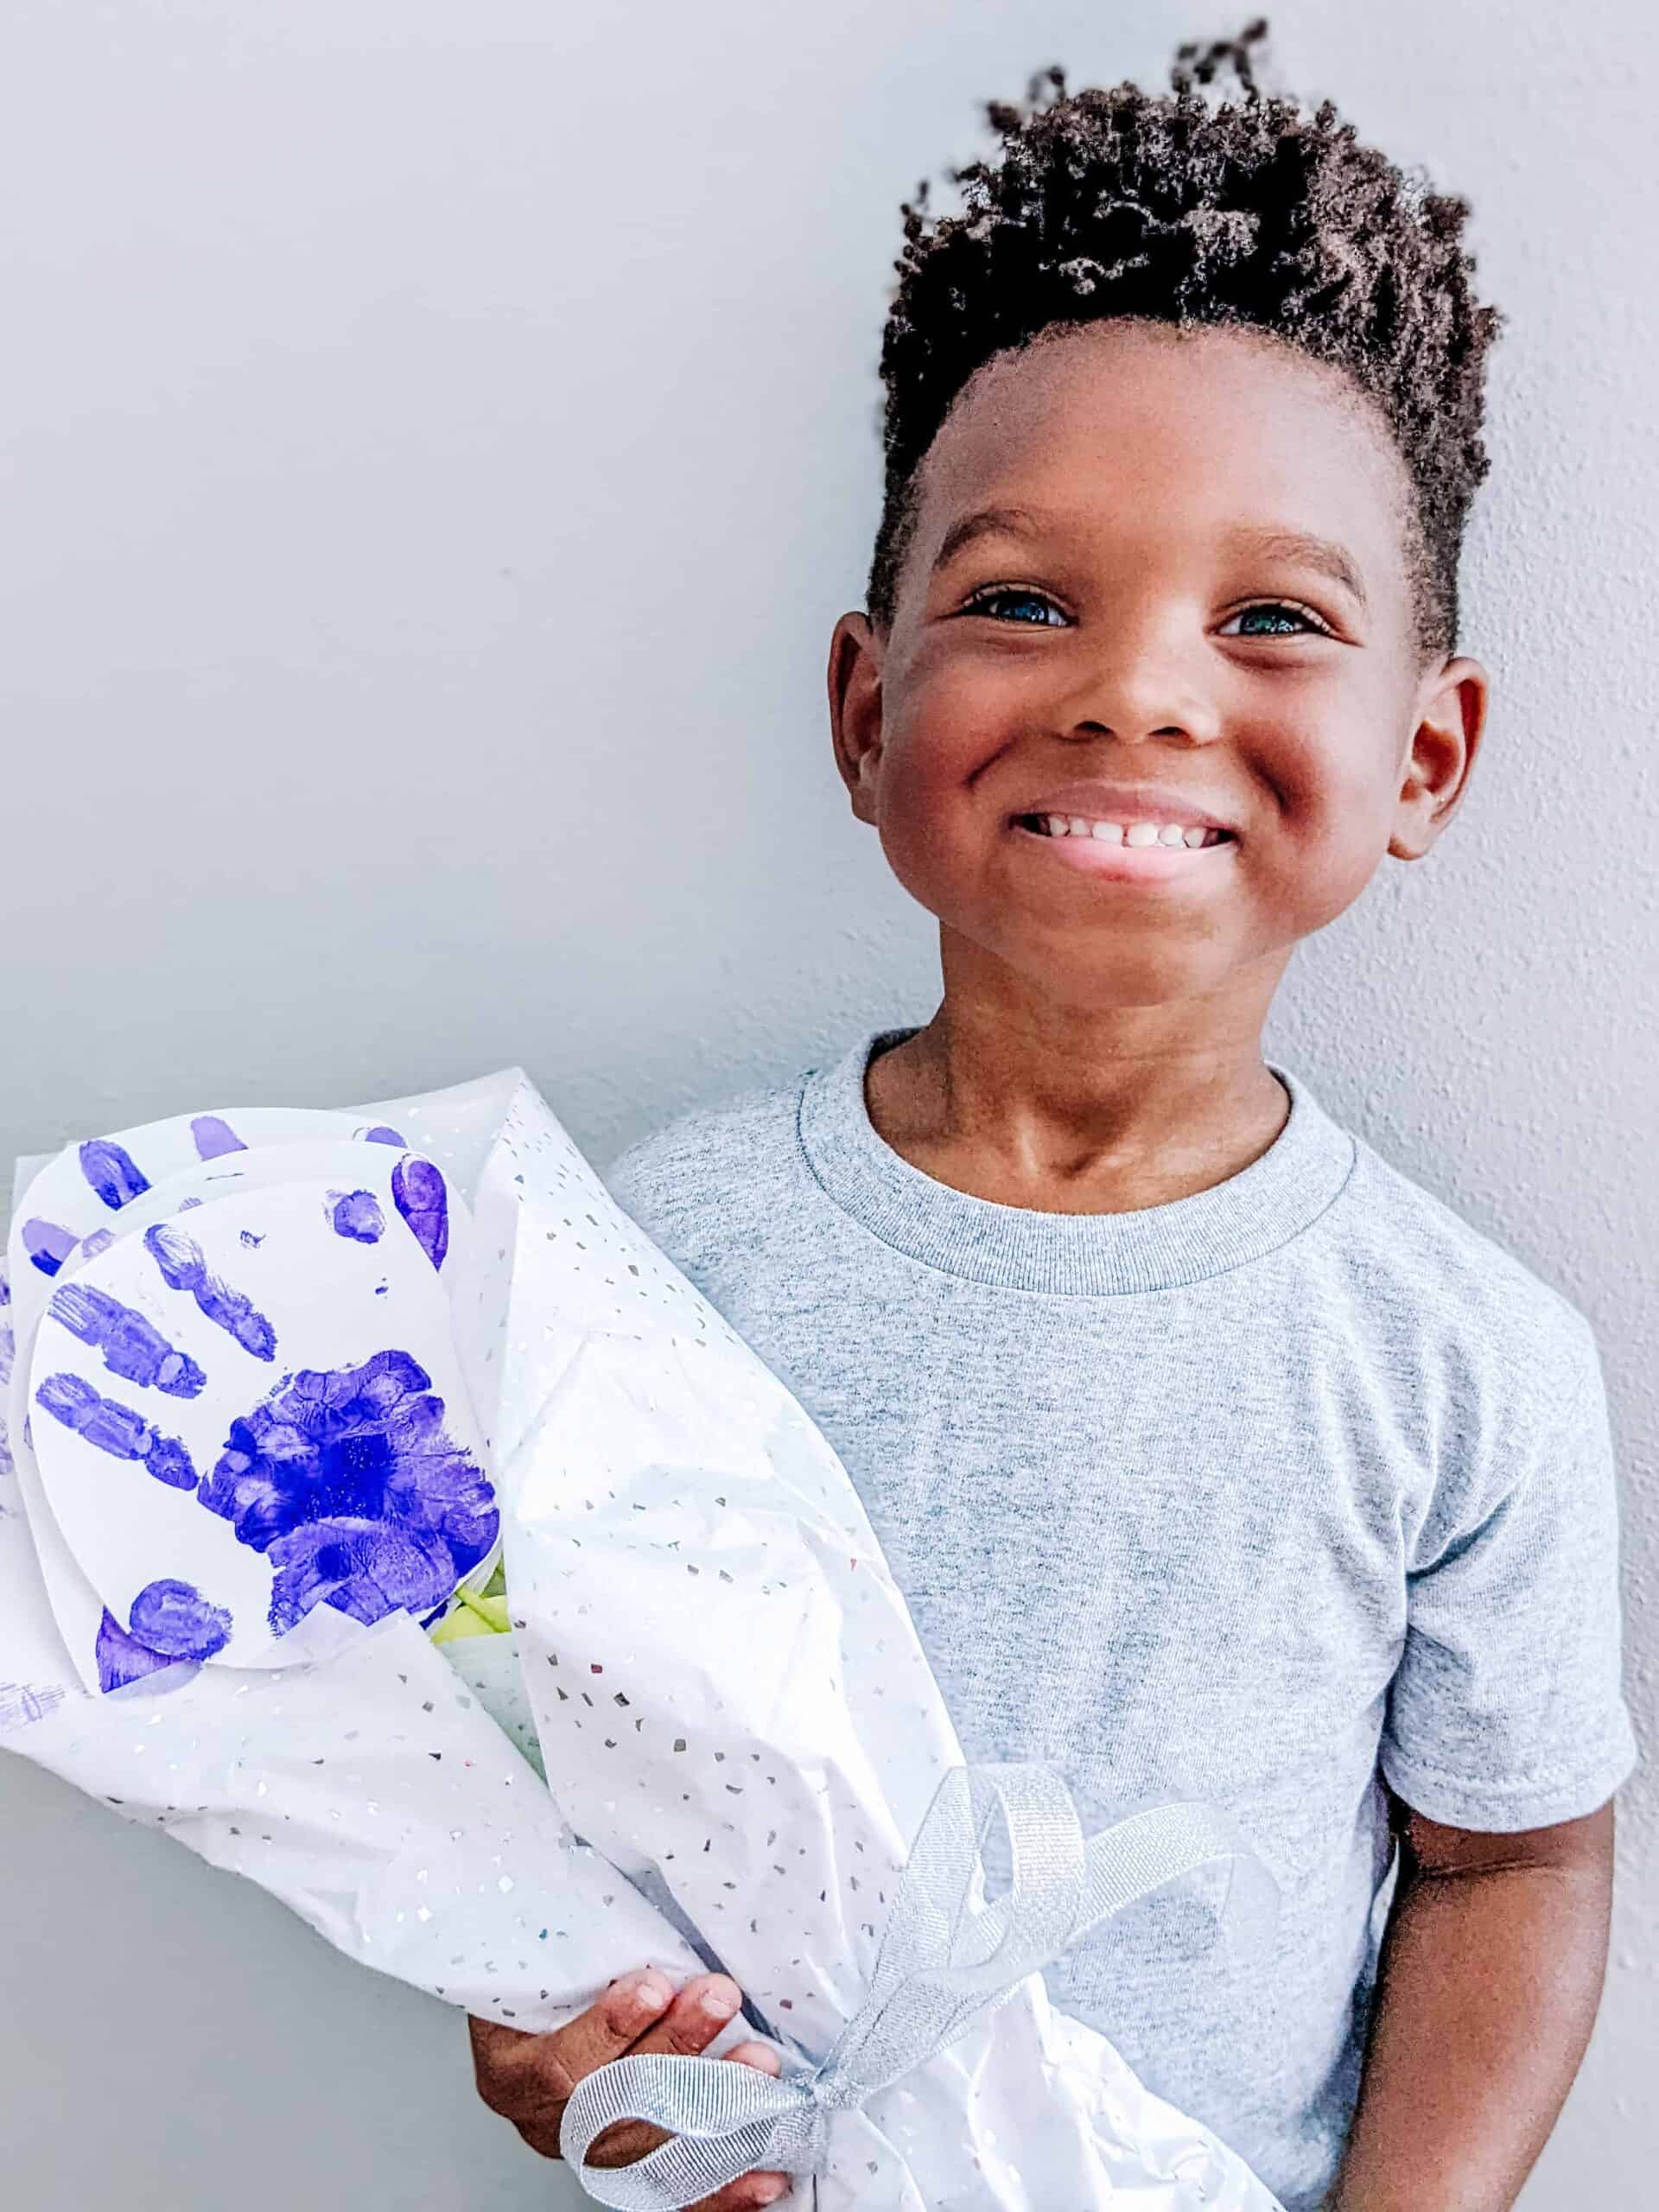
Supplies
- White cardstock
- Non-toxic paint (3 colors for the handprint flowers)
- Foam brush
- Paper plate
- Scissors
- Jumbo green craft stick
- Green cardstock
- Decorative tissue paper
- Ribbon
- Wooden dowel
- Green acrylic paint
- Glitter (optional)
Directions
- Add drops of paint to a paper Use at least 3 different colors.
- Use a foam brush to apply paint from the paper plate to your child’s Then place your child’s hand on white cardstock. You will need at least six handprints for your bouquet. Set cardstock aside to dry.
- Paint your wooden dowels green to create the Set aside to dry.
- Cut out the handprints, and then tape a stick to the back of each Cut out leaves from green cardstock, then tape to the dowel.
- Finally, use decorative tissue paper to wrap the handprint bouquet, then tie with
Paint Resist Mother’s Day Card
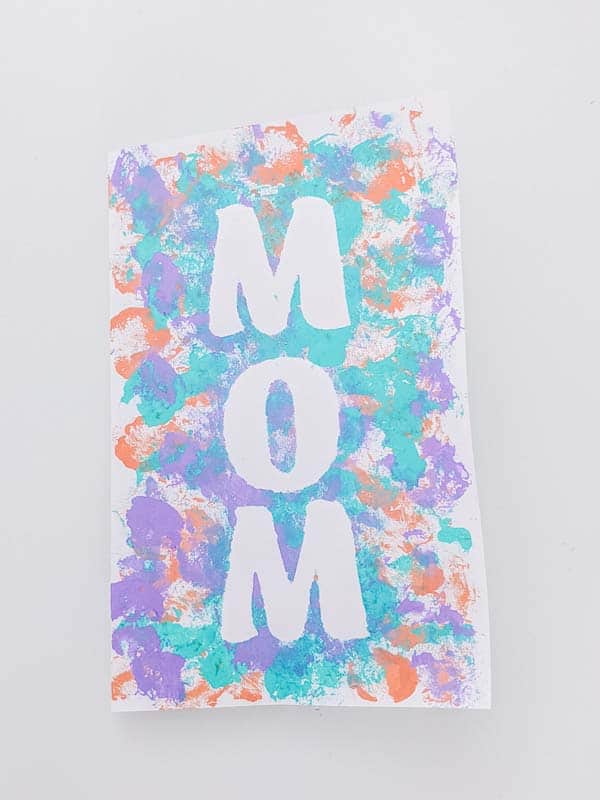
Supplies
- White heavy cardstock or poster board
- Paint
- Clothespin
- Cotton balls
- Paper plate
- Foam alphabet stickers
Directions
- Fold your cardstock or poster board in half to create the
- Use foam alphabet stickers to spell the word, MOM (or the name of your choice) on the front side of the card.
- Add a few drops of different color paint on a paper
- Clip a cotton ball with a clothespin to create your painting
- Paint over the entire front side of the card, including the word spelled Once your child is finished, set the card aside to dry.
- Finally, remove the stickers to reveal a beautiful Mother’s Day Your child can write a special message inside the card.
DIY Photo Cube for Mom

Supplies
- Wood block (3” or 4”)
- Acrylic paint (mom’s favorite color)
- Foam brush (2)
- Decoupage glue
- 5-6 photos of child(ren)
- Scissors
- Ruler
- Pencil
Directions
- Use the foam brush to paint the wood block with acrylic paint on all Set it aside to dry.
- Measure each photo so they are about half an inch smaller than each side of the block, then cut.
- Coat the back of each photo with a thin layer of decoupage glue then press onto the wood block.
- Finally, apply another coat over the images and wait for it to
DIY Mother’s Day Card

Supplies:
- Colored cardstock (2 per card)
- Scissors
- Glue
- Pencil (optional)
- Pom poms (1 per card)
Directions:
- First, cut four strips of colored cardstock for your flower. You will also need to cut out leaves and a stem from green cardstock.
- Next, take two of the paper strips and glue them together to form a cross. Glue two more strips together to form another cross.
- Glue both crosses together.
- Take the end of one of the strips and glue it to the center of the cross. Repeat until all the strips are glued to the center to create your flower.
- Now it’s time to glue the pom pom into the middle of the paper flower.
- Fold your second colored cardstock in half to create a card. Then glue the green stem onto the bottom of the card.
- Glue the paper flower on top of the stem.
- Fold the leaves in half and glue them to the stem.
- Finally, write a beautiful message inside the card for the most important woman in your life.
DIY Mother’s Day Paper Flower Bouquet
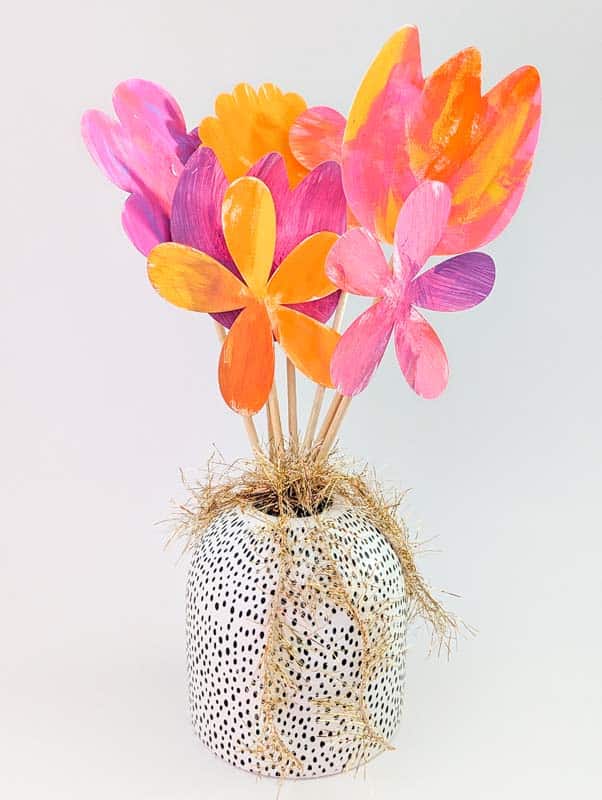
Supplies:
- White cardstock
- Paint (spring colors)
- Paper plate or paint palette
- Hot glue gun
- Wooden dowels (3/16-inch dowels 12 inches long)
- Foam brush
- Vase
- Yarn
Directions:
- First, cut out different flower shapes for your bouquet on white cardstock.
- Next, paint your paper flowers. You can blend different colors or use one color for each flower. Set it aside to dry when you are finished.
- Once the paint is dried, use a hot glue gun to attach the flowers to a wooden dowel rod.
- Finally, use yarn to tie the flower bouquet. Add them to a vase.
Follow Karimah Henry @craftingafunlife for more fun craft ideas!
*Originally published in the May 2022, 2023 & 2024 issues of Tampa Bay Parenting Magazine.