
Scary Good: Our Team Shares Their Favorite DIY Halloween Costumes
Have no fear–DIY Halloween costumes are easier to make than you think!
Oh, the things you can create with a glue gun, fabric and some cardboard!
We asked our team here at Tampa Bay Parenting Magazine to share their favorite DIY Halloween costumes from over the years in hopes it might help inspire other parents to give DIY a go this year!
And boy, did they deliver!
Check out some of our favorites below–the photos are in no particular order, so scroll through to see them all. Happy Halloween!
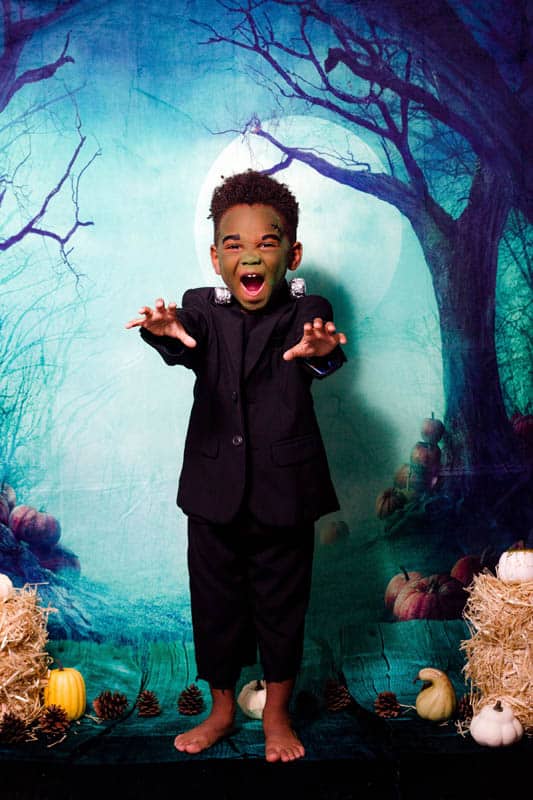
DIY Frankenstein Costume by TBPM contributor Karimah Henry of craftingafunlife.com:
It’s officially SPOOKY SEASON! Who doesn’t love Frankenstein?! He’s definitely one of my favorite Halloween characters. If you’re a fan too, you’ll love this adorable craft and easy-to-make DIY costume.
Supplies:
- Black headband
- Aluminum foil
- Empty soda or water bottles (2)
- Scissors
- Hot glue gun with glue sticks
- Oversize black blazer
- Black or striped shirt
- Black pants
Directions
- Use scissors to cut the top part of the recycled bottles so that you just have the cap and the neck of the bottle left. Trim off any remaining plastic.
- Cut two square pieces of aluminum foil, and then wrap the pieces around the bottle caps.
- Use hot glue to attach the caps onto the headbands.
- Dress your child in the blazer, shirt and pants to complete the outfit.
- Want to go all out with this costume? Apply green costume makeup to your child’s face using a beauty blender or sponge. Then use a waterproof eyeliner pen to draw scars and darken the eyebrows.
Karimah is sharing even MORE cute Halloween craft ideas for kids here!
DIY Halloween Costumes Through the Years by TBPM Associate Editor Brie Gorecki:
I've always loved crafting and I grew up doing theater so creating costumes has always been a favorite pastime of mine. Before my son was born, I would even create Halloween costumes for my dog!
For the last 7 years, I've been DIY-ing his costumes and have had so much fun coming up with them. Although he's gotten older, I love that he still asks me to make his costumes and it's become a fun bonding experience for us.
One of the best things about creating your own DIY costume is that you don't have to spend a fortune! Thrift shops, craft stores, and dollar stores are great places to find pieces to use.
My biggest tip – always have a hot glue gun and super glue handy. No matter what you're making, those will always come to the rescue.
Strong Man DIY Costume:
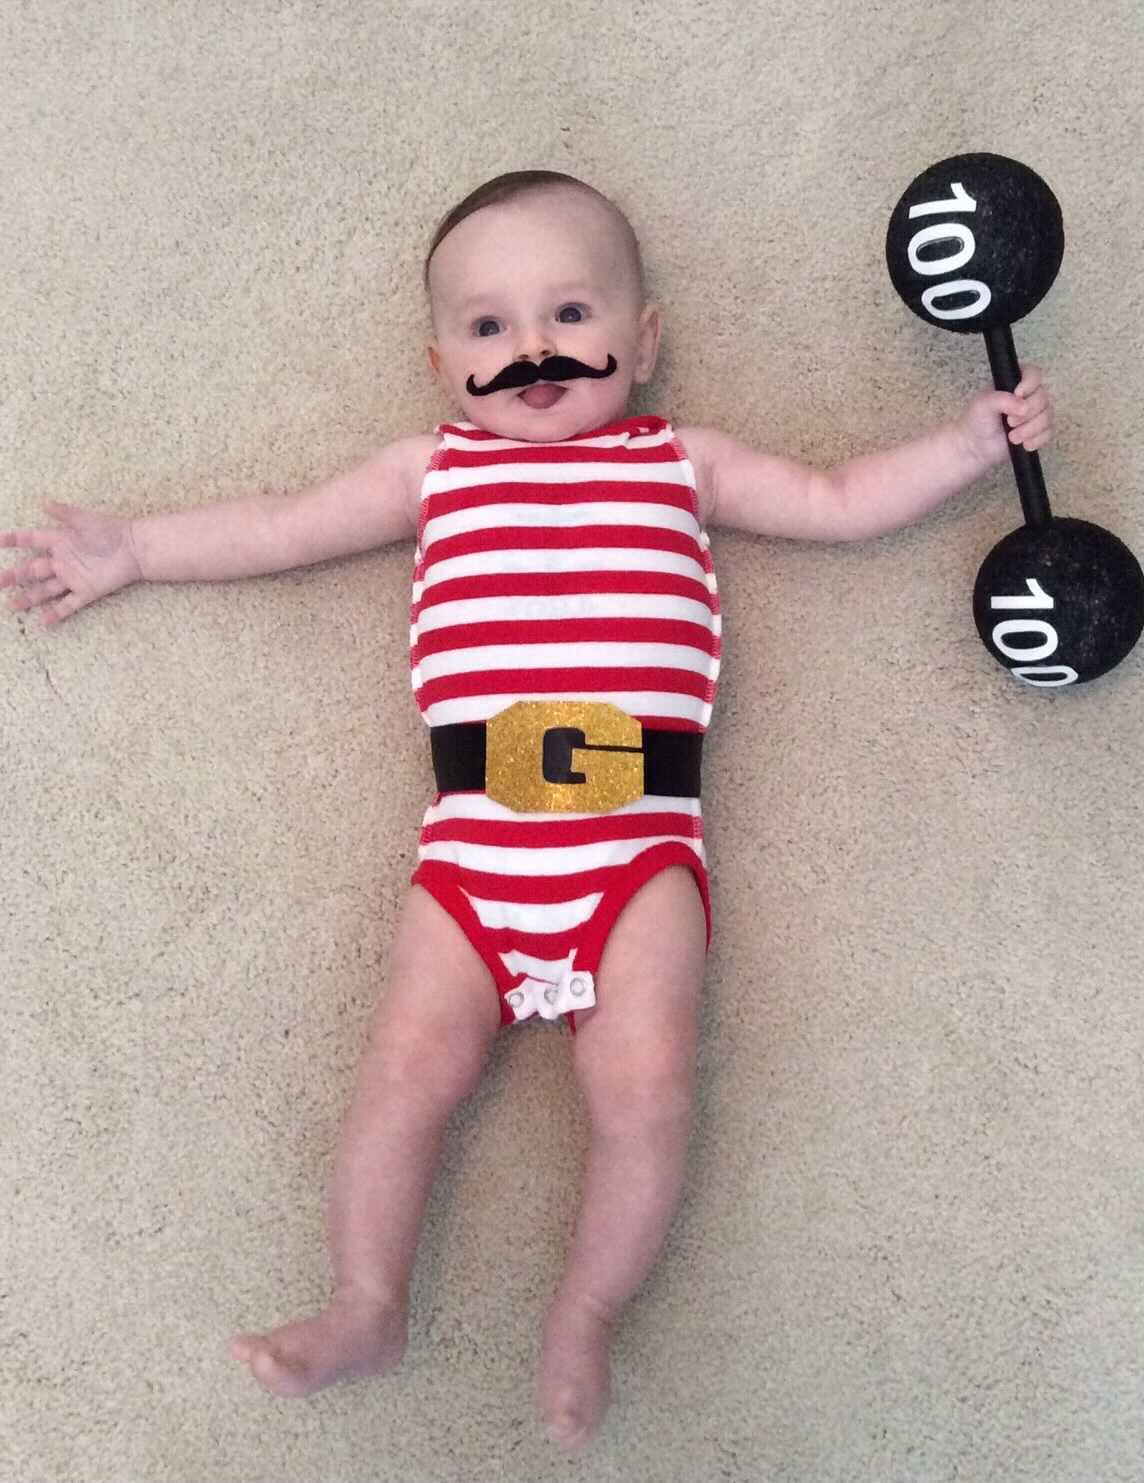
For this costume, I cut the sleeves off a striped onesie. I took a thick piece of ribbon and cut out the letter “G” from a piece of glittered craft foam and glued it together to use as the belt.
For the dumbbell, I spray painted two foam balls and a wooden stick black and glued them together. Then I cut out and glued on the “100” numbers to each side.
For the moustache, I found a pack of stick-on moustaches in the dollar section of Target. Since his baby skin was still sensitive, I made sure to wear off some of the stickiness before putting it on him.
Baby Frappucino DIY Costume:
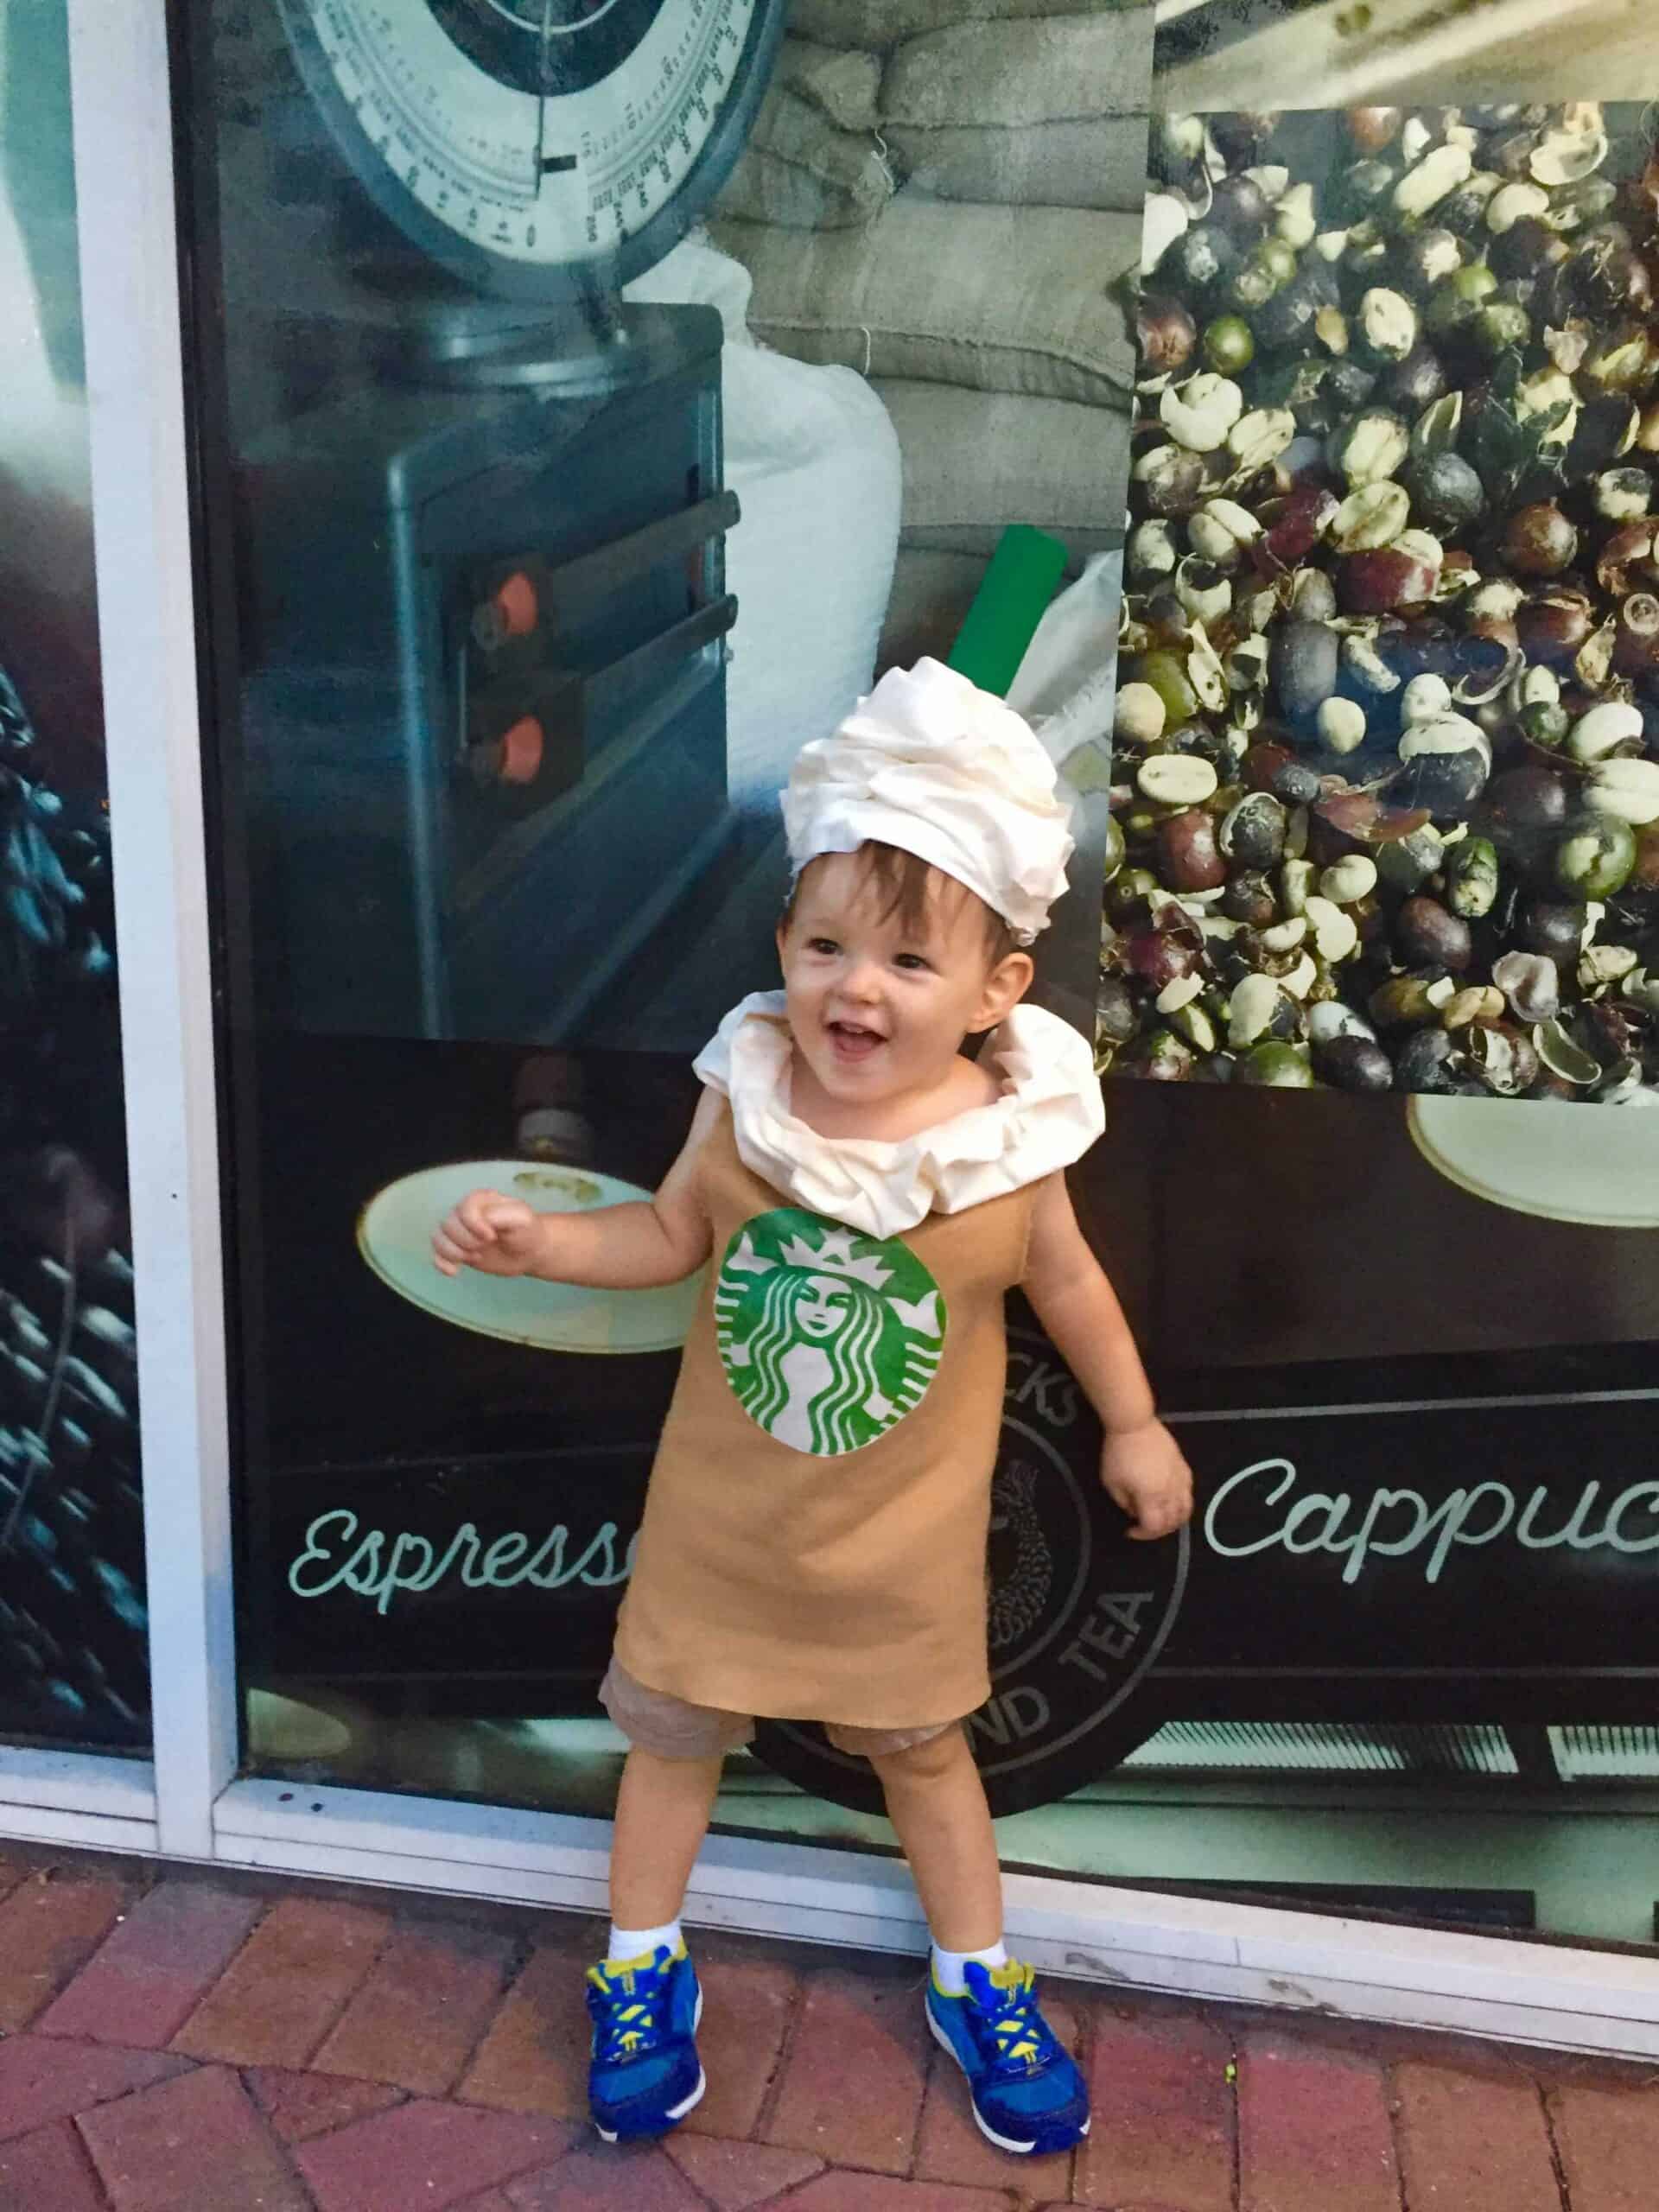
This will probably be my most favorite costume of all time. I absolutely love it. For the body, I bought a giant piece of felt at the fabric store and cut holes for the arms.
Next, I took strips of white fabric and sewed them around the neckline, twisting in different directions as I randomly stitched them down (to give the illusion of whipped cream).
For the logo, I printed it out on a piece of iron-on paper and pressed it to the felt. For the headpiece, I cut the visor off of a ball cap and then spray painted a paper towel roll green and glued it to the top to be used as the straw.
I then took strips of fabric and twisted and glued them down around the hat, similar to how I did the neckline. After I was done, I stuffed a few cotton balls under the white fabric to make it extra puffy.
Bob the Builder DIY Costume:
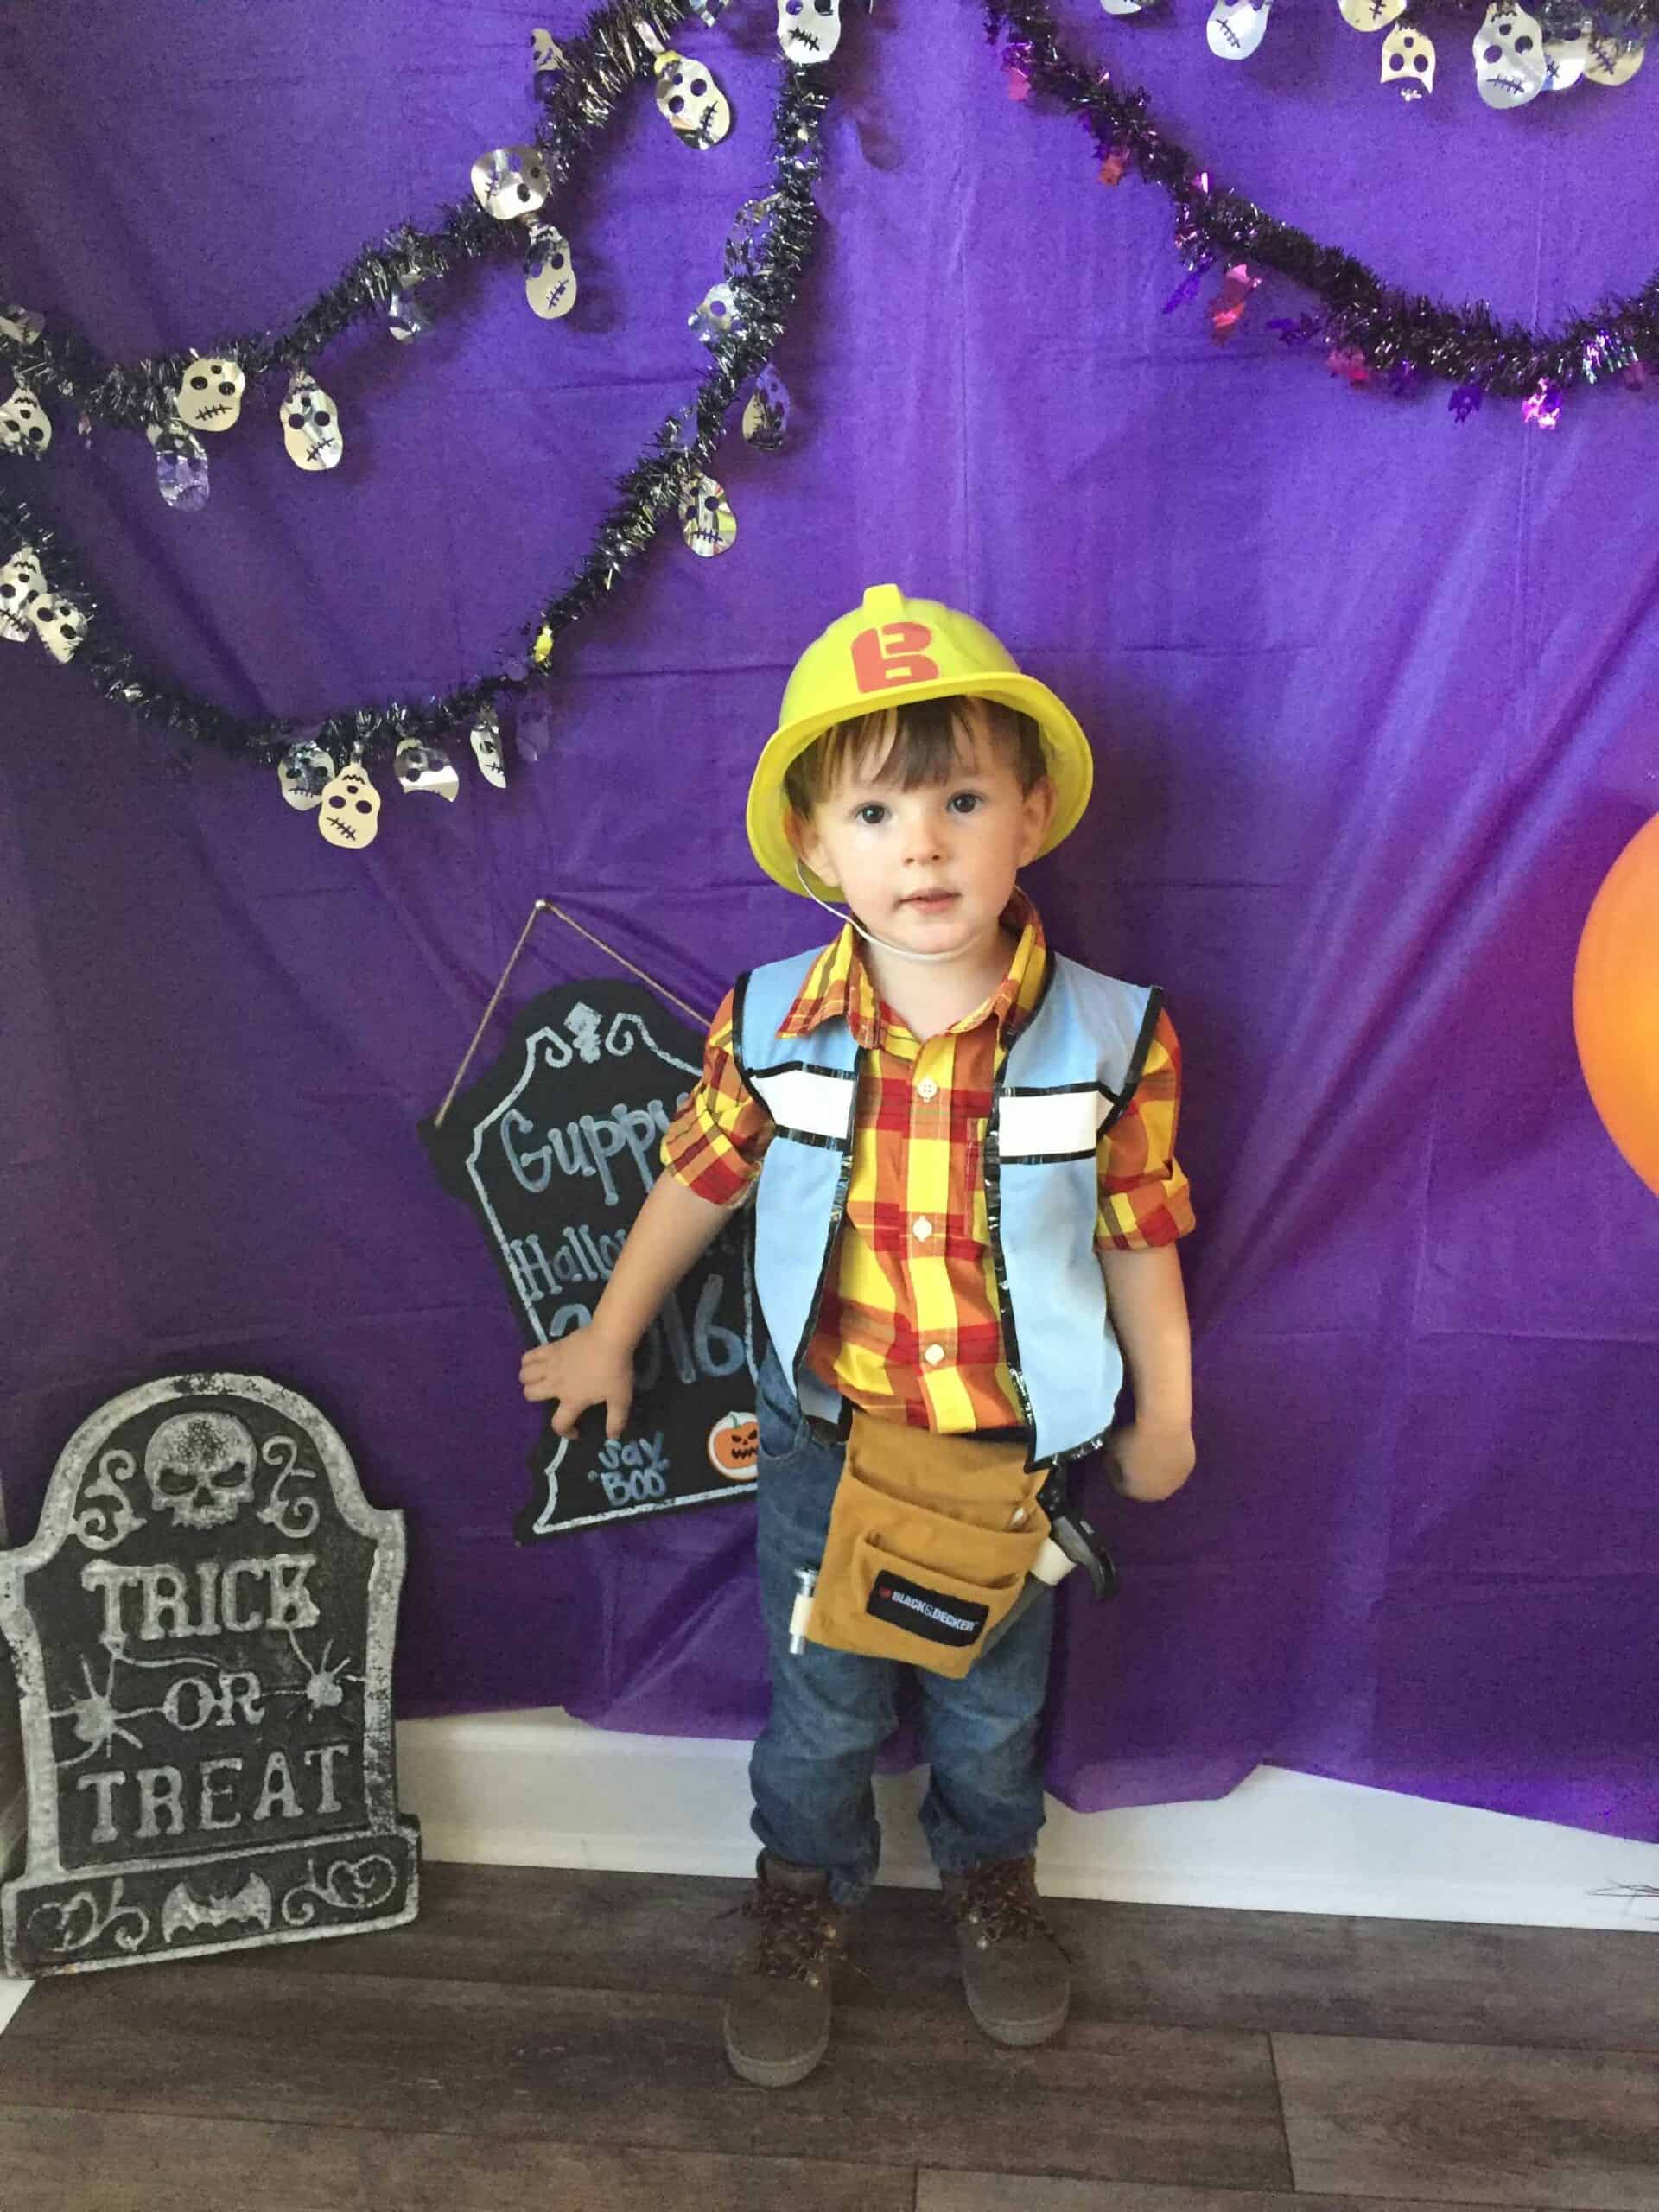
He was really into Bob the Builder at that age and wanted to dress up like him. I came to the realization that yellow and red checkered shirts were not so easy to find for some reason, so I bought a red and white plaid shirt and dyed it yellow.
For the vest, I took a blue polo shirt and cut it to the form of a vest. I used white duct tape and black electrical tape to make the designs on the vest.
For the hat, I bought a cheap one at the dollar store and added Bob's signature “B” on it (which was also on the back of the vest in white duct tape).
Woody from Toy Story Costume:
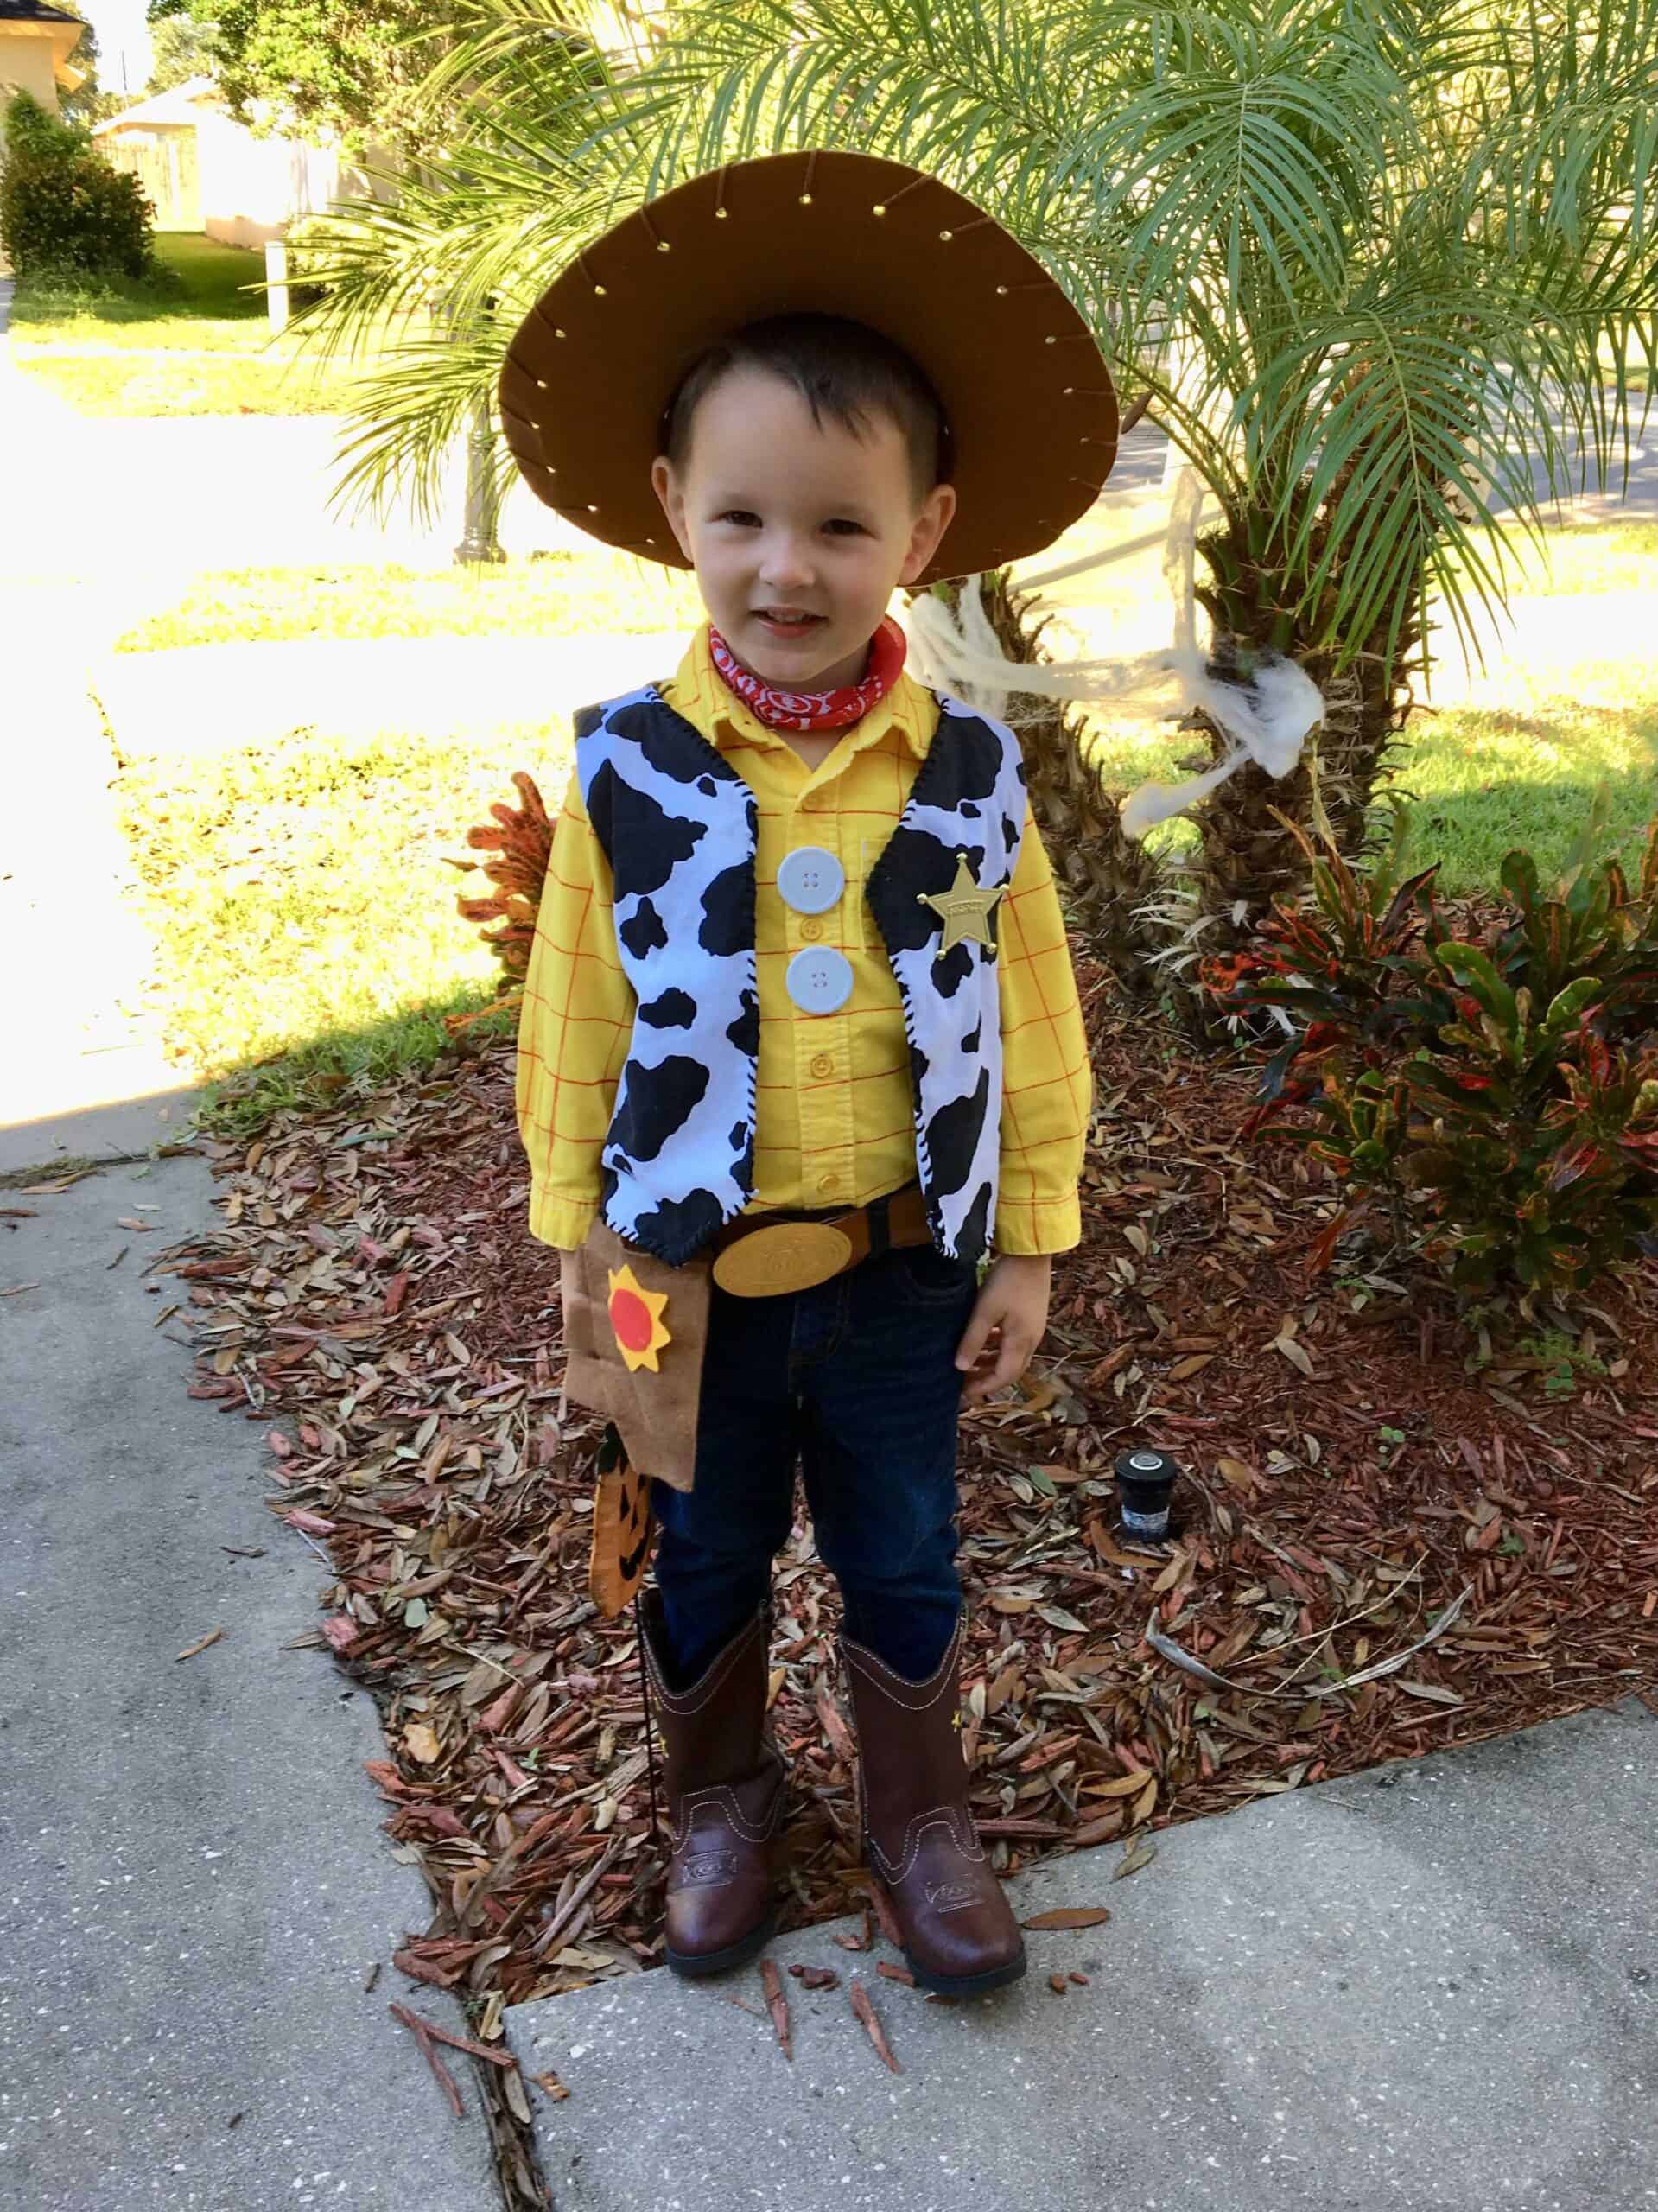
We're big Disney fans in our house and Woody from Toy Story was a favorite of our little guy.
Since I learned my lesson about the red and yellow shirt from the prior year, I dyed a white shirt yellow, used red fabric pen to make the lines, and then sewed two large buttons on in the middle.
For the vest, I took white t-shirt and cut it into a vest form. I bought the cow print fabric at a fabric store and covered the vest with it, using large black stitching to mirror Woody's vest (not pictured – the faux pull-string attached to the back of it that was made out of a circular piece of styrofoam and white string!).
I made the holster out of felt and found the hat and belt at The Disney Store.
BB-8 DIY Costume:
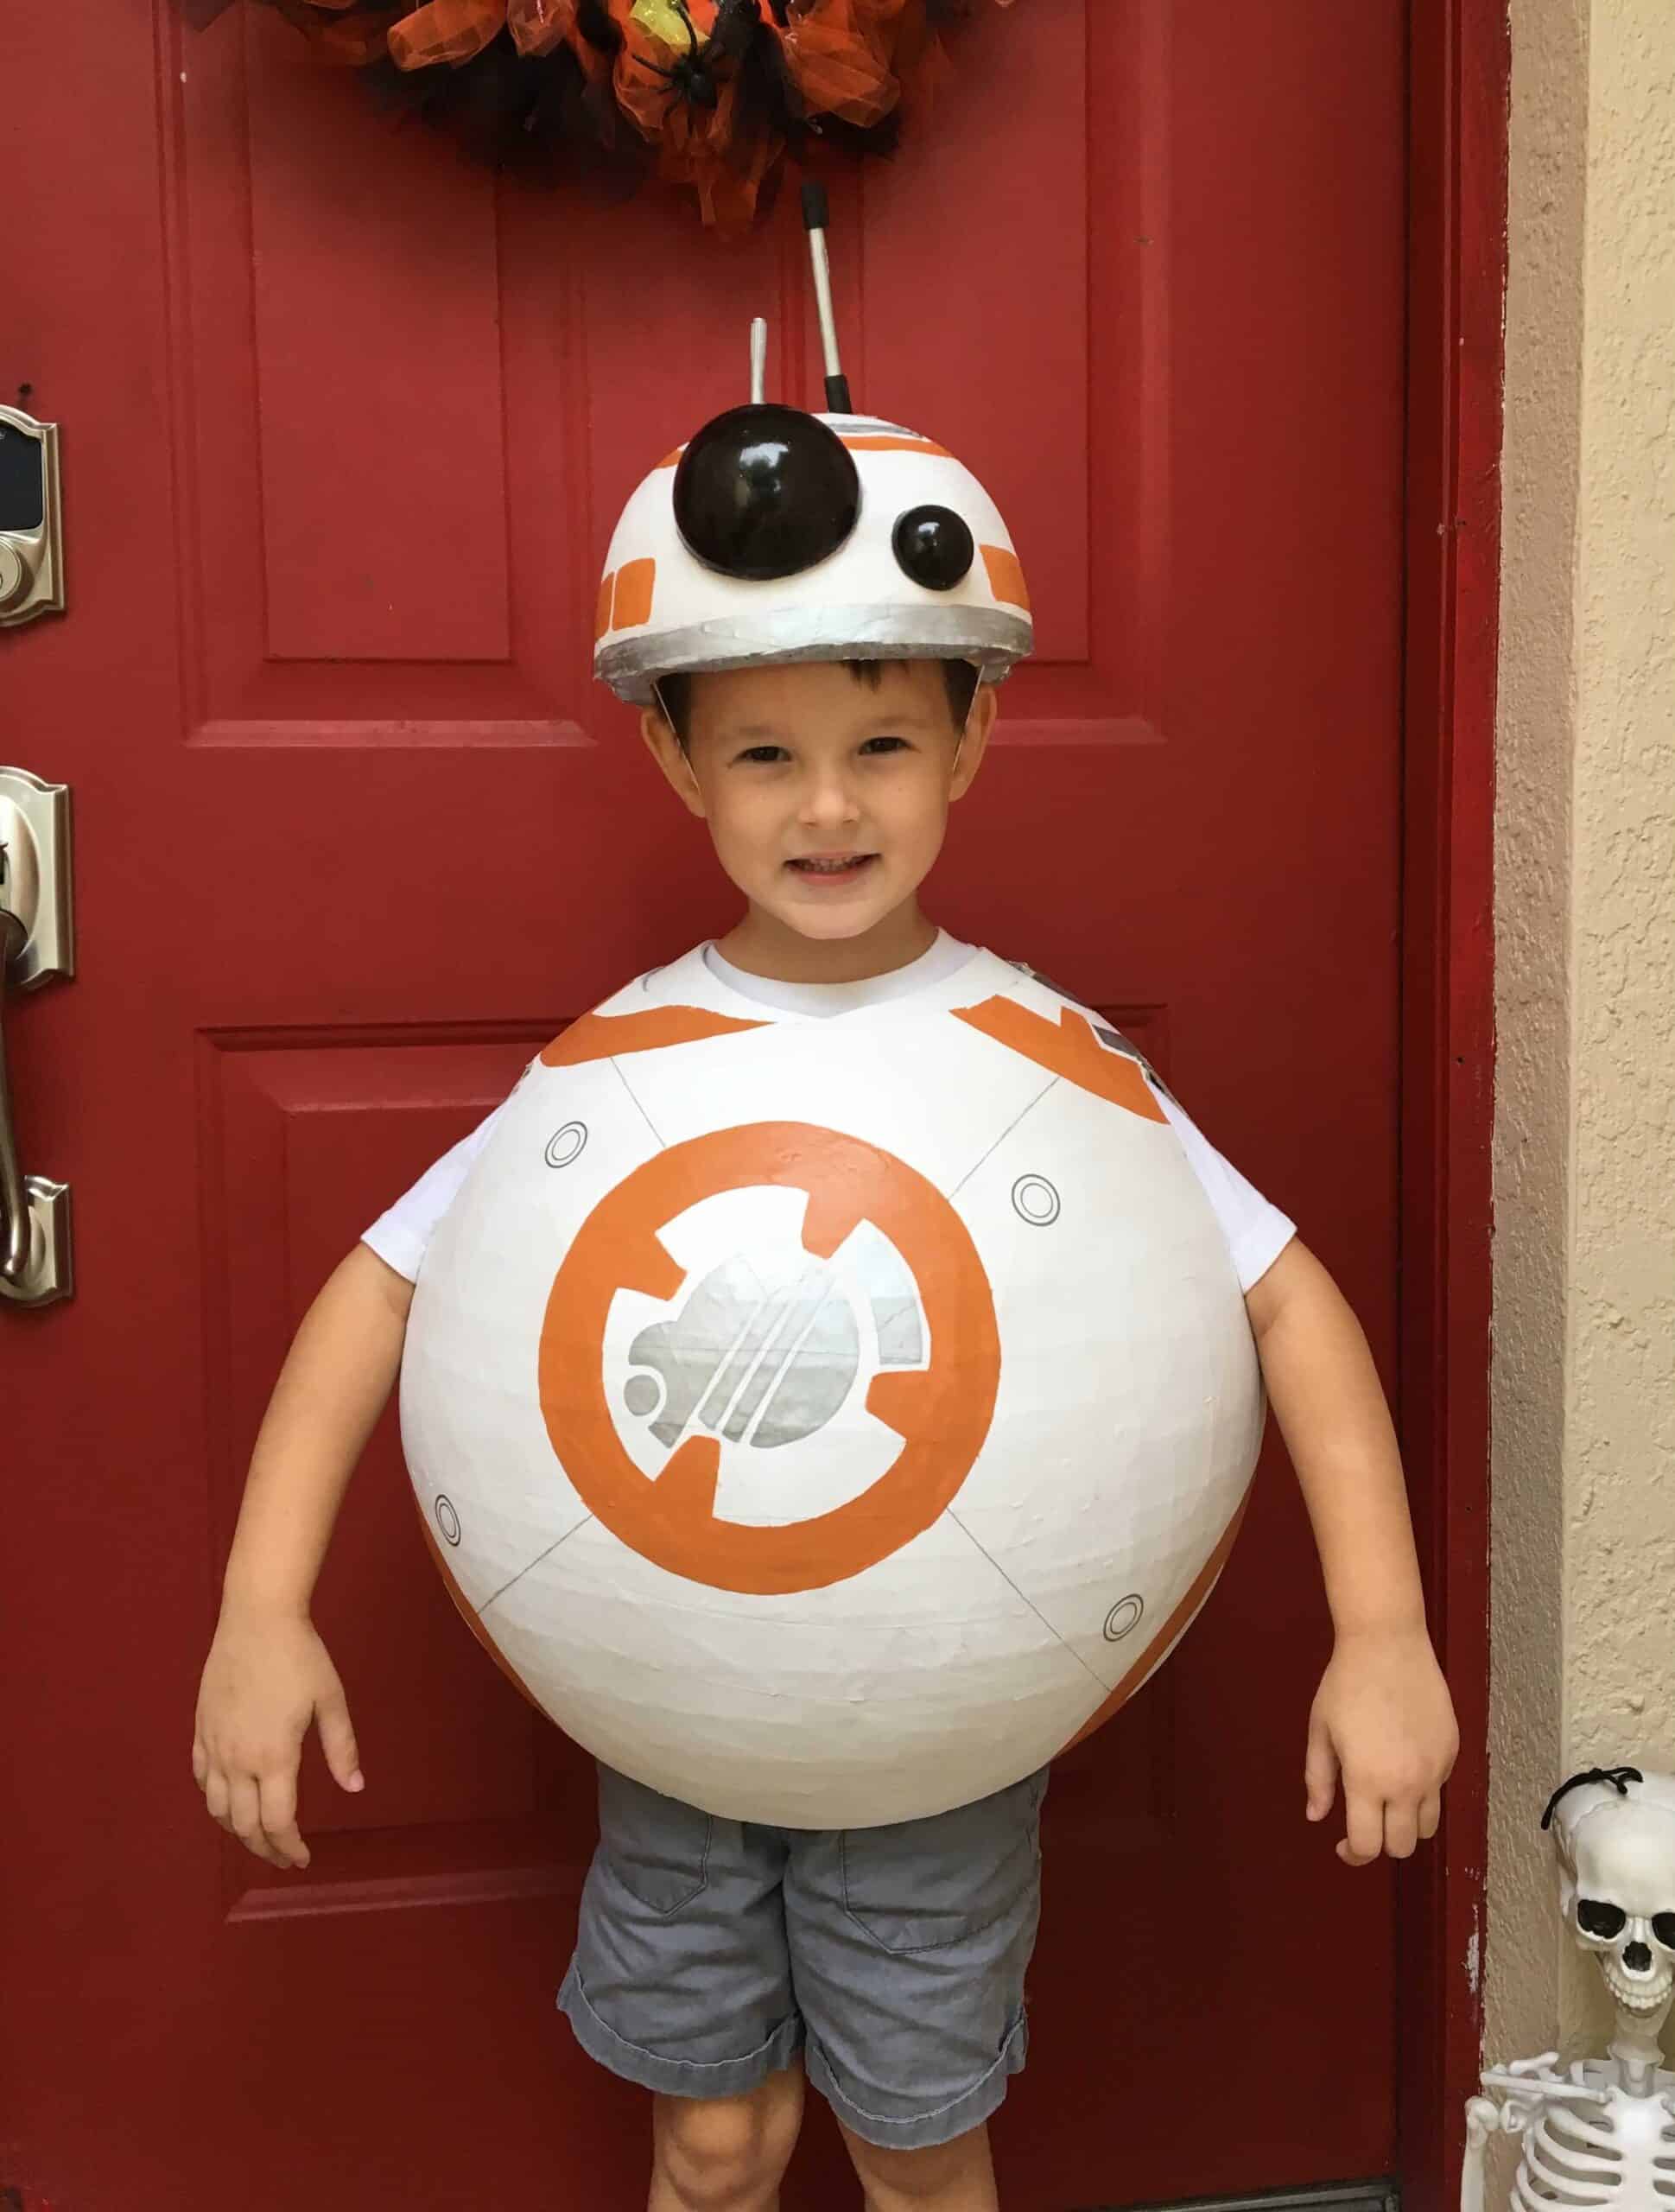
Age four is when the Star Wars phase began. This one was not as hard as I had anticipated, but it was definitely the most time-consuming.
I started by using an old yoga ball as the form. I covered it with plastic wrap and then used papier mache to create the outer layers. Since each layer had to dry for 24 hours before adding new, I started a few weeks prior since I wanted a good amount of layers to ensure it would be nice and durable.
Once the last layer was on and it was totally dry, I used a box cutter to cut the top and bottom holes. I popped the yoga ball and let it deflate so that I could remove it (tip – the plastic wrap prevented the papier mache from sticking to the ball).
Once I was able to get it over his head, I marked the spots to cut out holes for his arms. For the head, I took an old bike helmet and removed the outer layer.
I put some papier mache on it to smooth it out and then spray painted both the head and the body with white spray paint. I printed out templates for the design and stenciled them on with pencil before painting them orange and silver.
I used plastic straws painted silver for the antennae, and used random objects I found in my house (a lip balm container and a cat toy) to paint black and use on the headpiece.
I attached an elastic band to the head and lined the neck and arm holes with white craft foam for extra comfort.
R2-D2 DIY Costume:
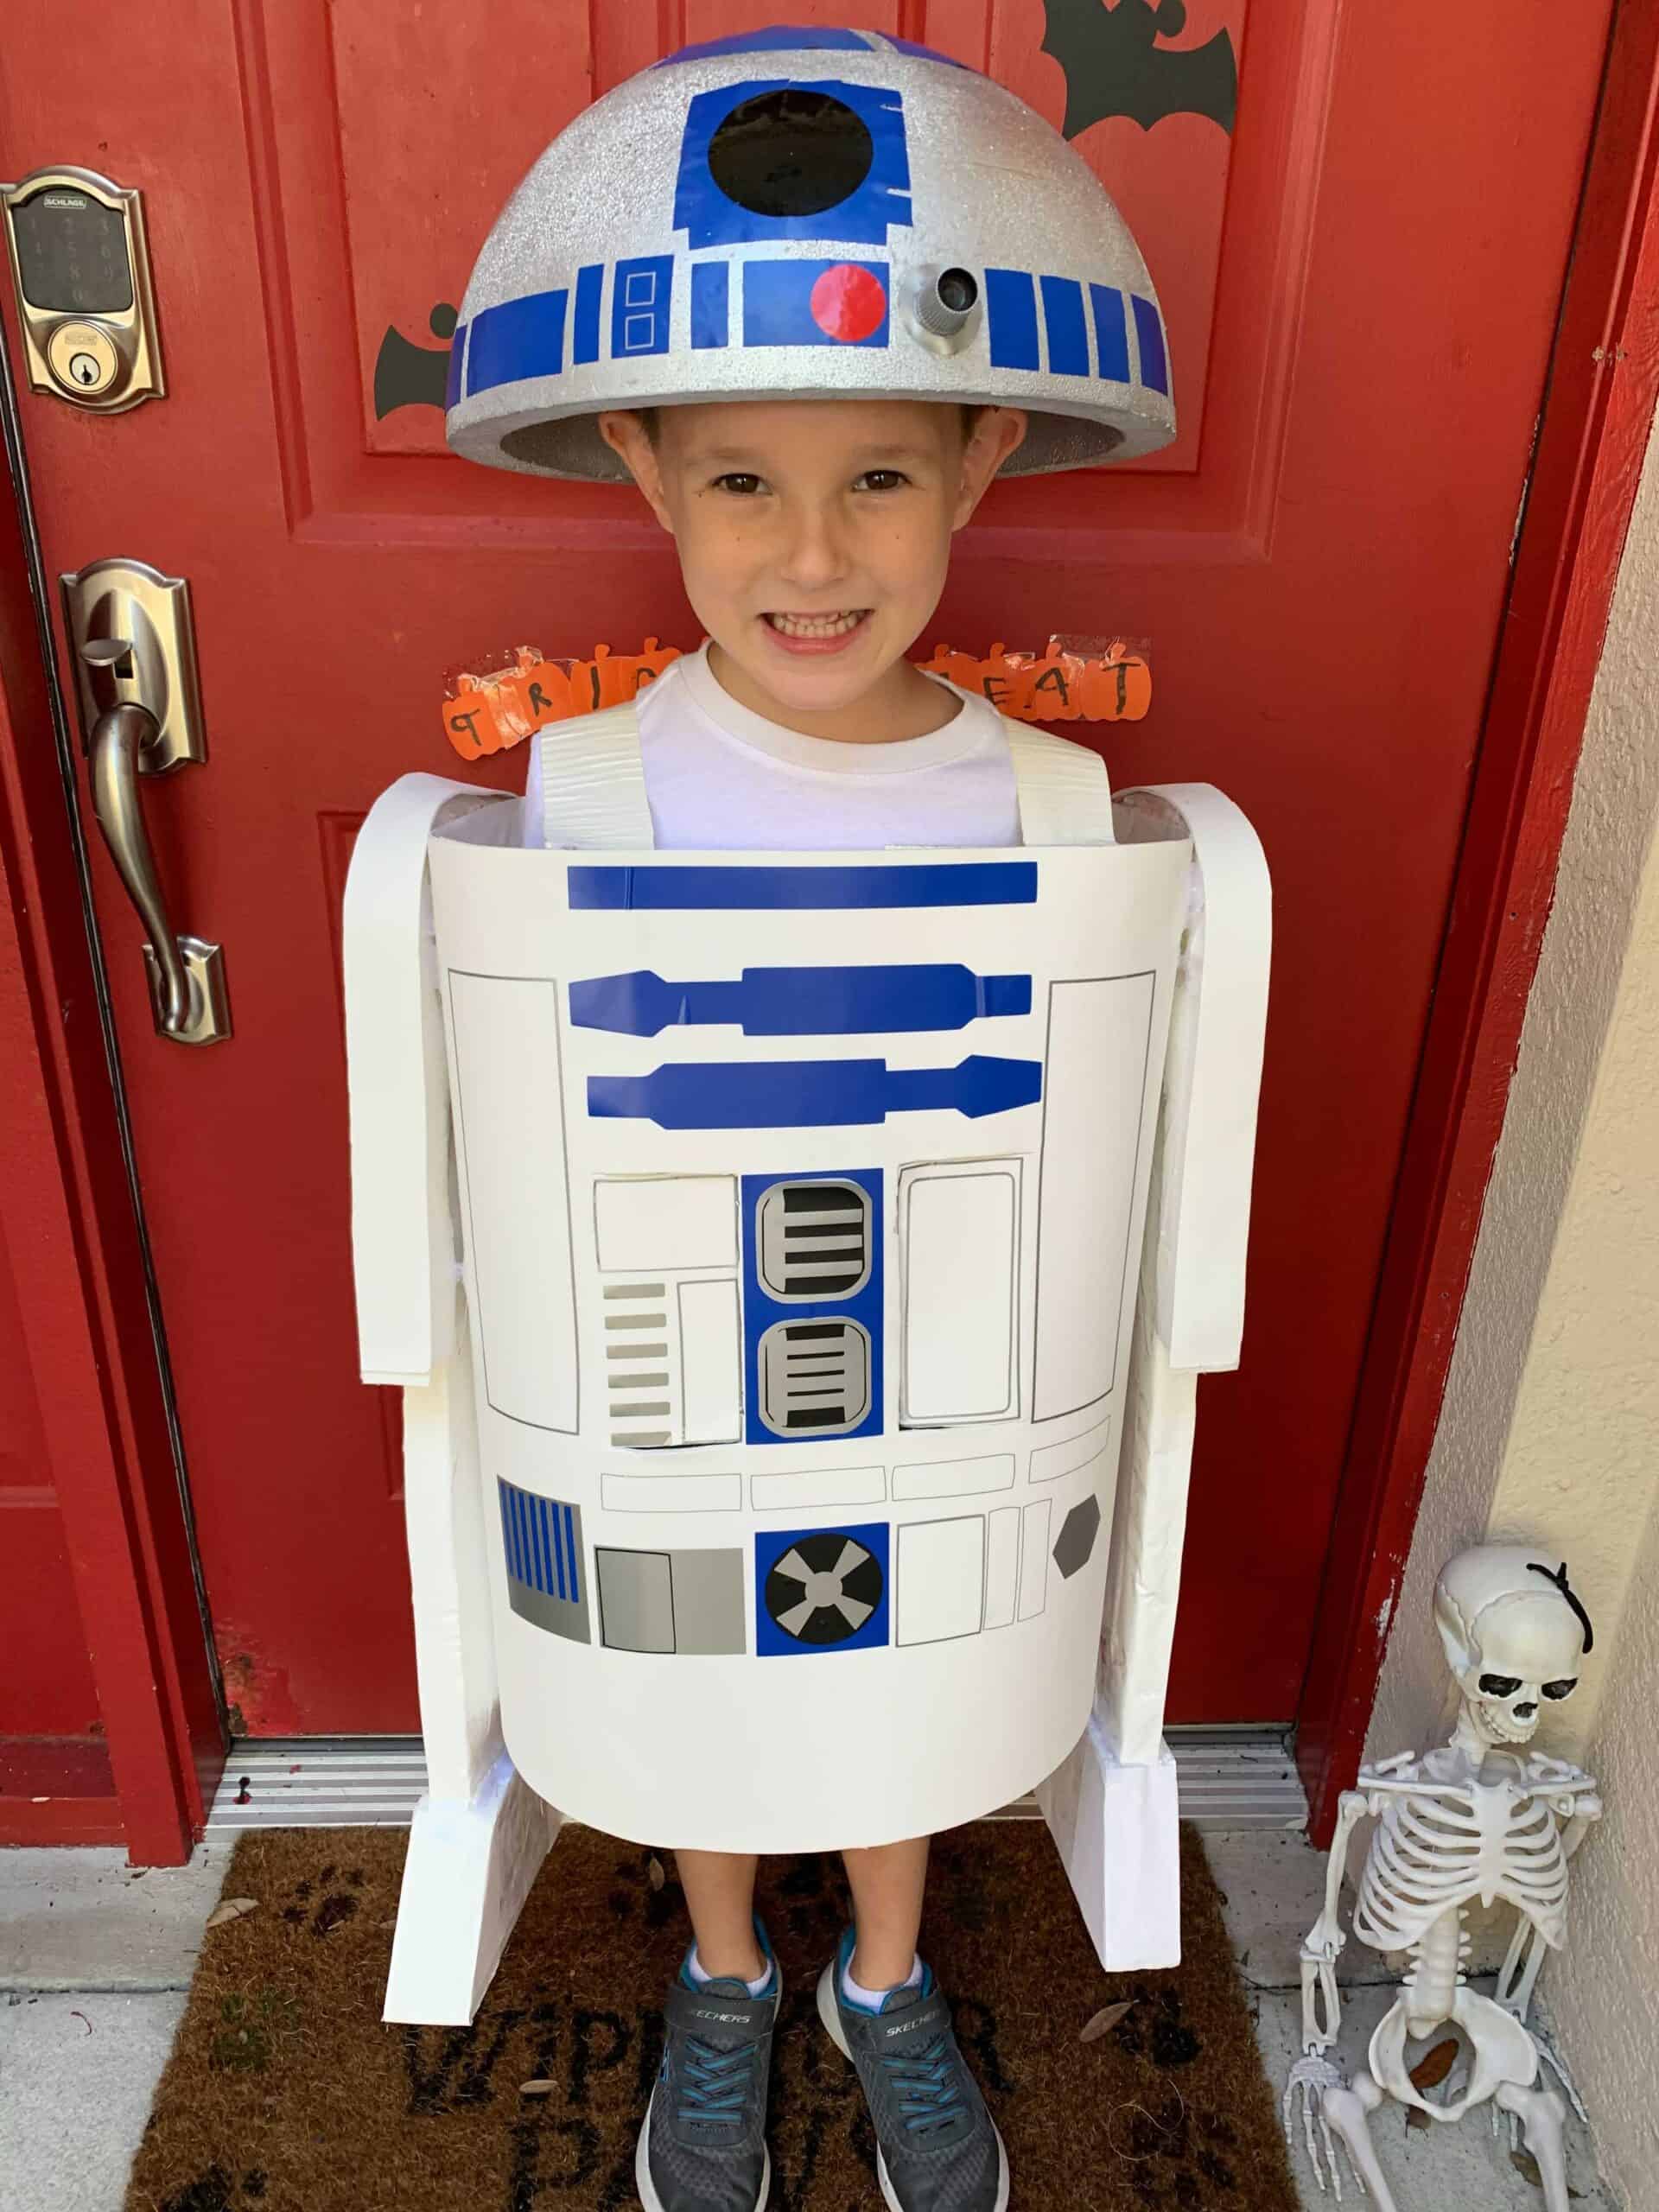
As you can see, the force was strong again the following year. For this costume, I took large pieces of styrofoam that came from a furniture delivery box and cut them into the shape for the legs.
To smooth them out, I covered them with white adhesive vinyl and used my Cricut to cut out the designs on them.
For the body, I glued thick, white craft foam to poster board and measured it to his body frame. I cut out the designs for this on my Cricut as well using adhesive vinyl.
I cut the two rectangular objects in the middle to be able to open and close, and added little tabs to the inside so that he could use his hands to pull them shut or open them and pop his arms out to hold his candy bucket.
I glued the legs to the body piece and made shoulder straps out of craft foam so that it could slip on and off over his head.
For the headpiece, I used a half-dome piece of styrofoam from the floral section of the craft store. I spray painted it silver and added stick-ons I made from my Cricut.
To keep it resting on his head, I cut the visor off an old ball cap and glued the top of the main part to the inside of the dome so that it would sit snuggly on his head but still be invisible.
Jack Skellington DIY Costume:
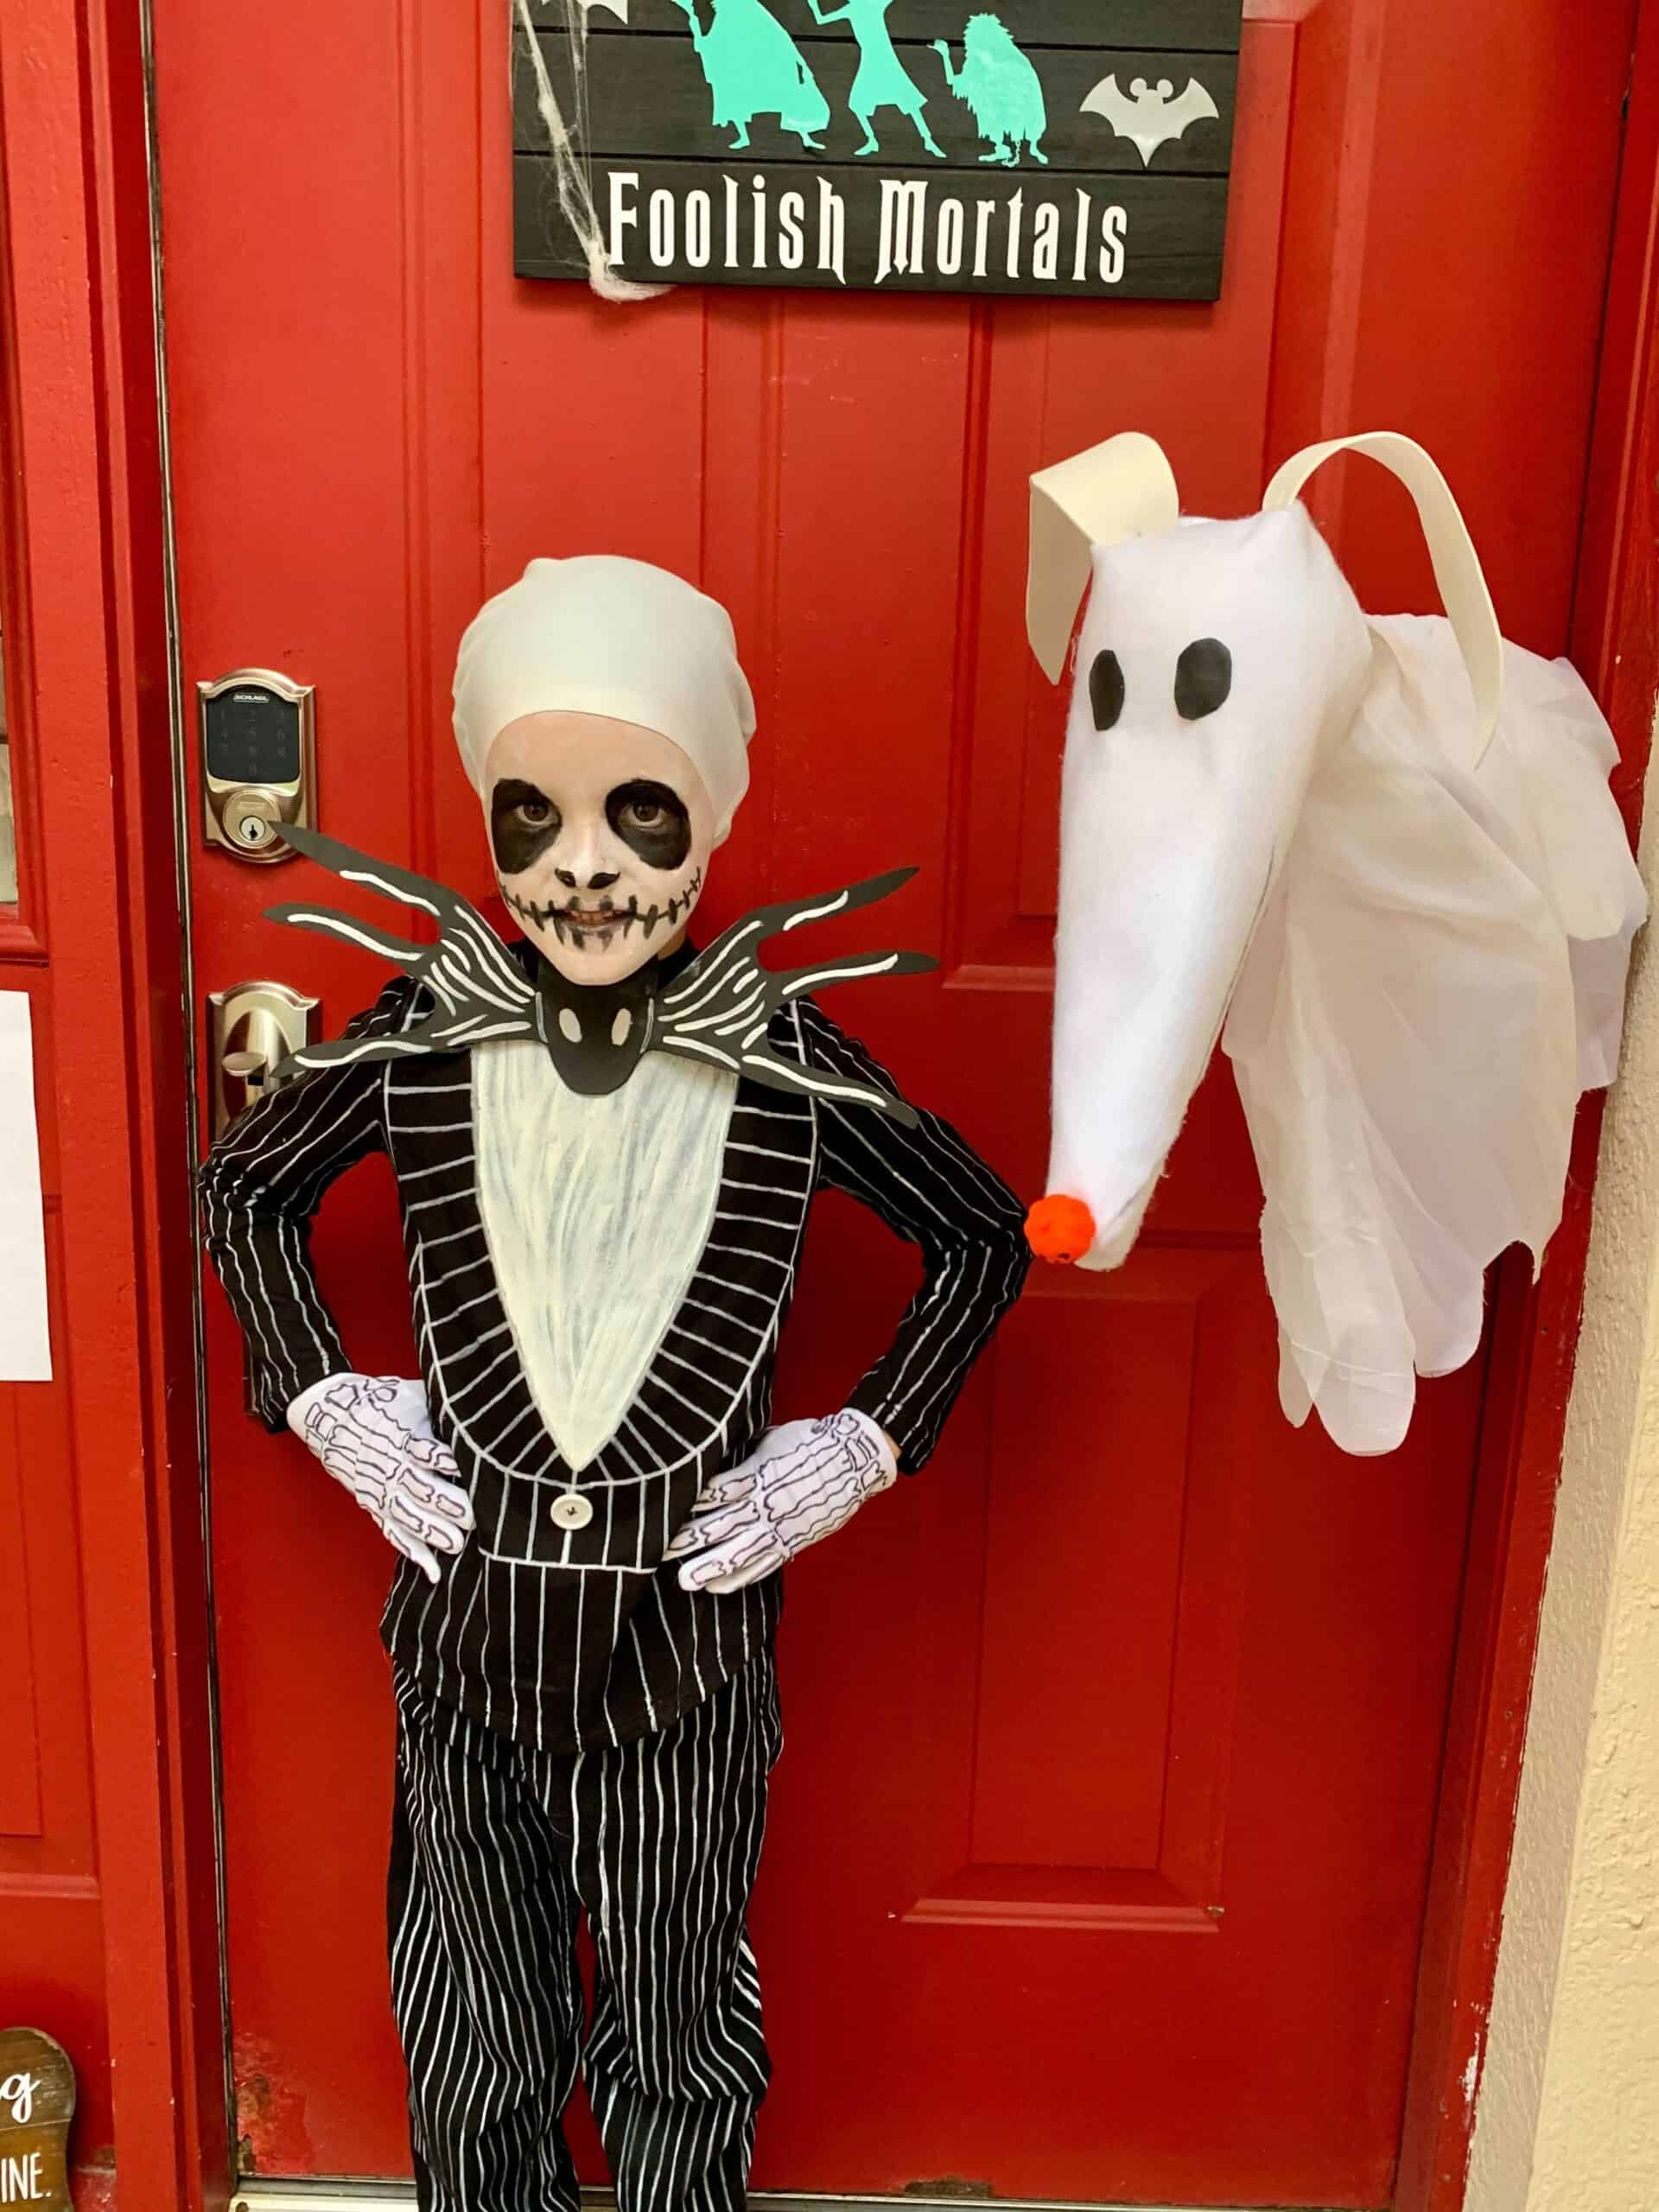
To create everyone's favorite Pumpkin King, I took a black shirt and black pants and drew the lines and jacket lapels on with a white paint pen.
I took regular fabric paint and painted the larger white area on the shirt and sewed a button on. The bat bowtie was made by cutting the design out of craft foam and drawing the details on with a white paint pen.
He wanted face paint instead of a mask, so I used a white swimmers cap to hide his hair and create the skull. I bought white gloves and drew the bones on with permanent marker.
To make Zero, I glued together round and cone-shaped pieces of styrofoam and then made the body out of craft foam.
I glued them all together and then covered his head with white felt, made his ears out of craft foam, glued a small pumpkin toy to the nose and then covered the body with a piece of sheer, white fabric.
To carry him around, I took a wire hanger and stuck it upside down inside the body so that my son could carry him using the hook of the hanger (and give the illusion that Zero was flying).
Pumpkin Scarecrow DIY Costume:
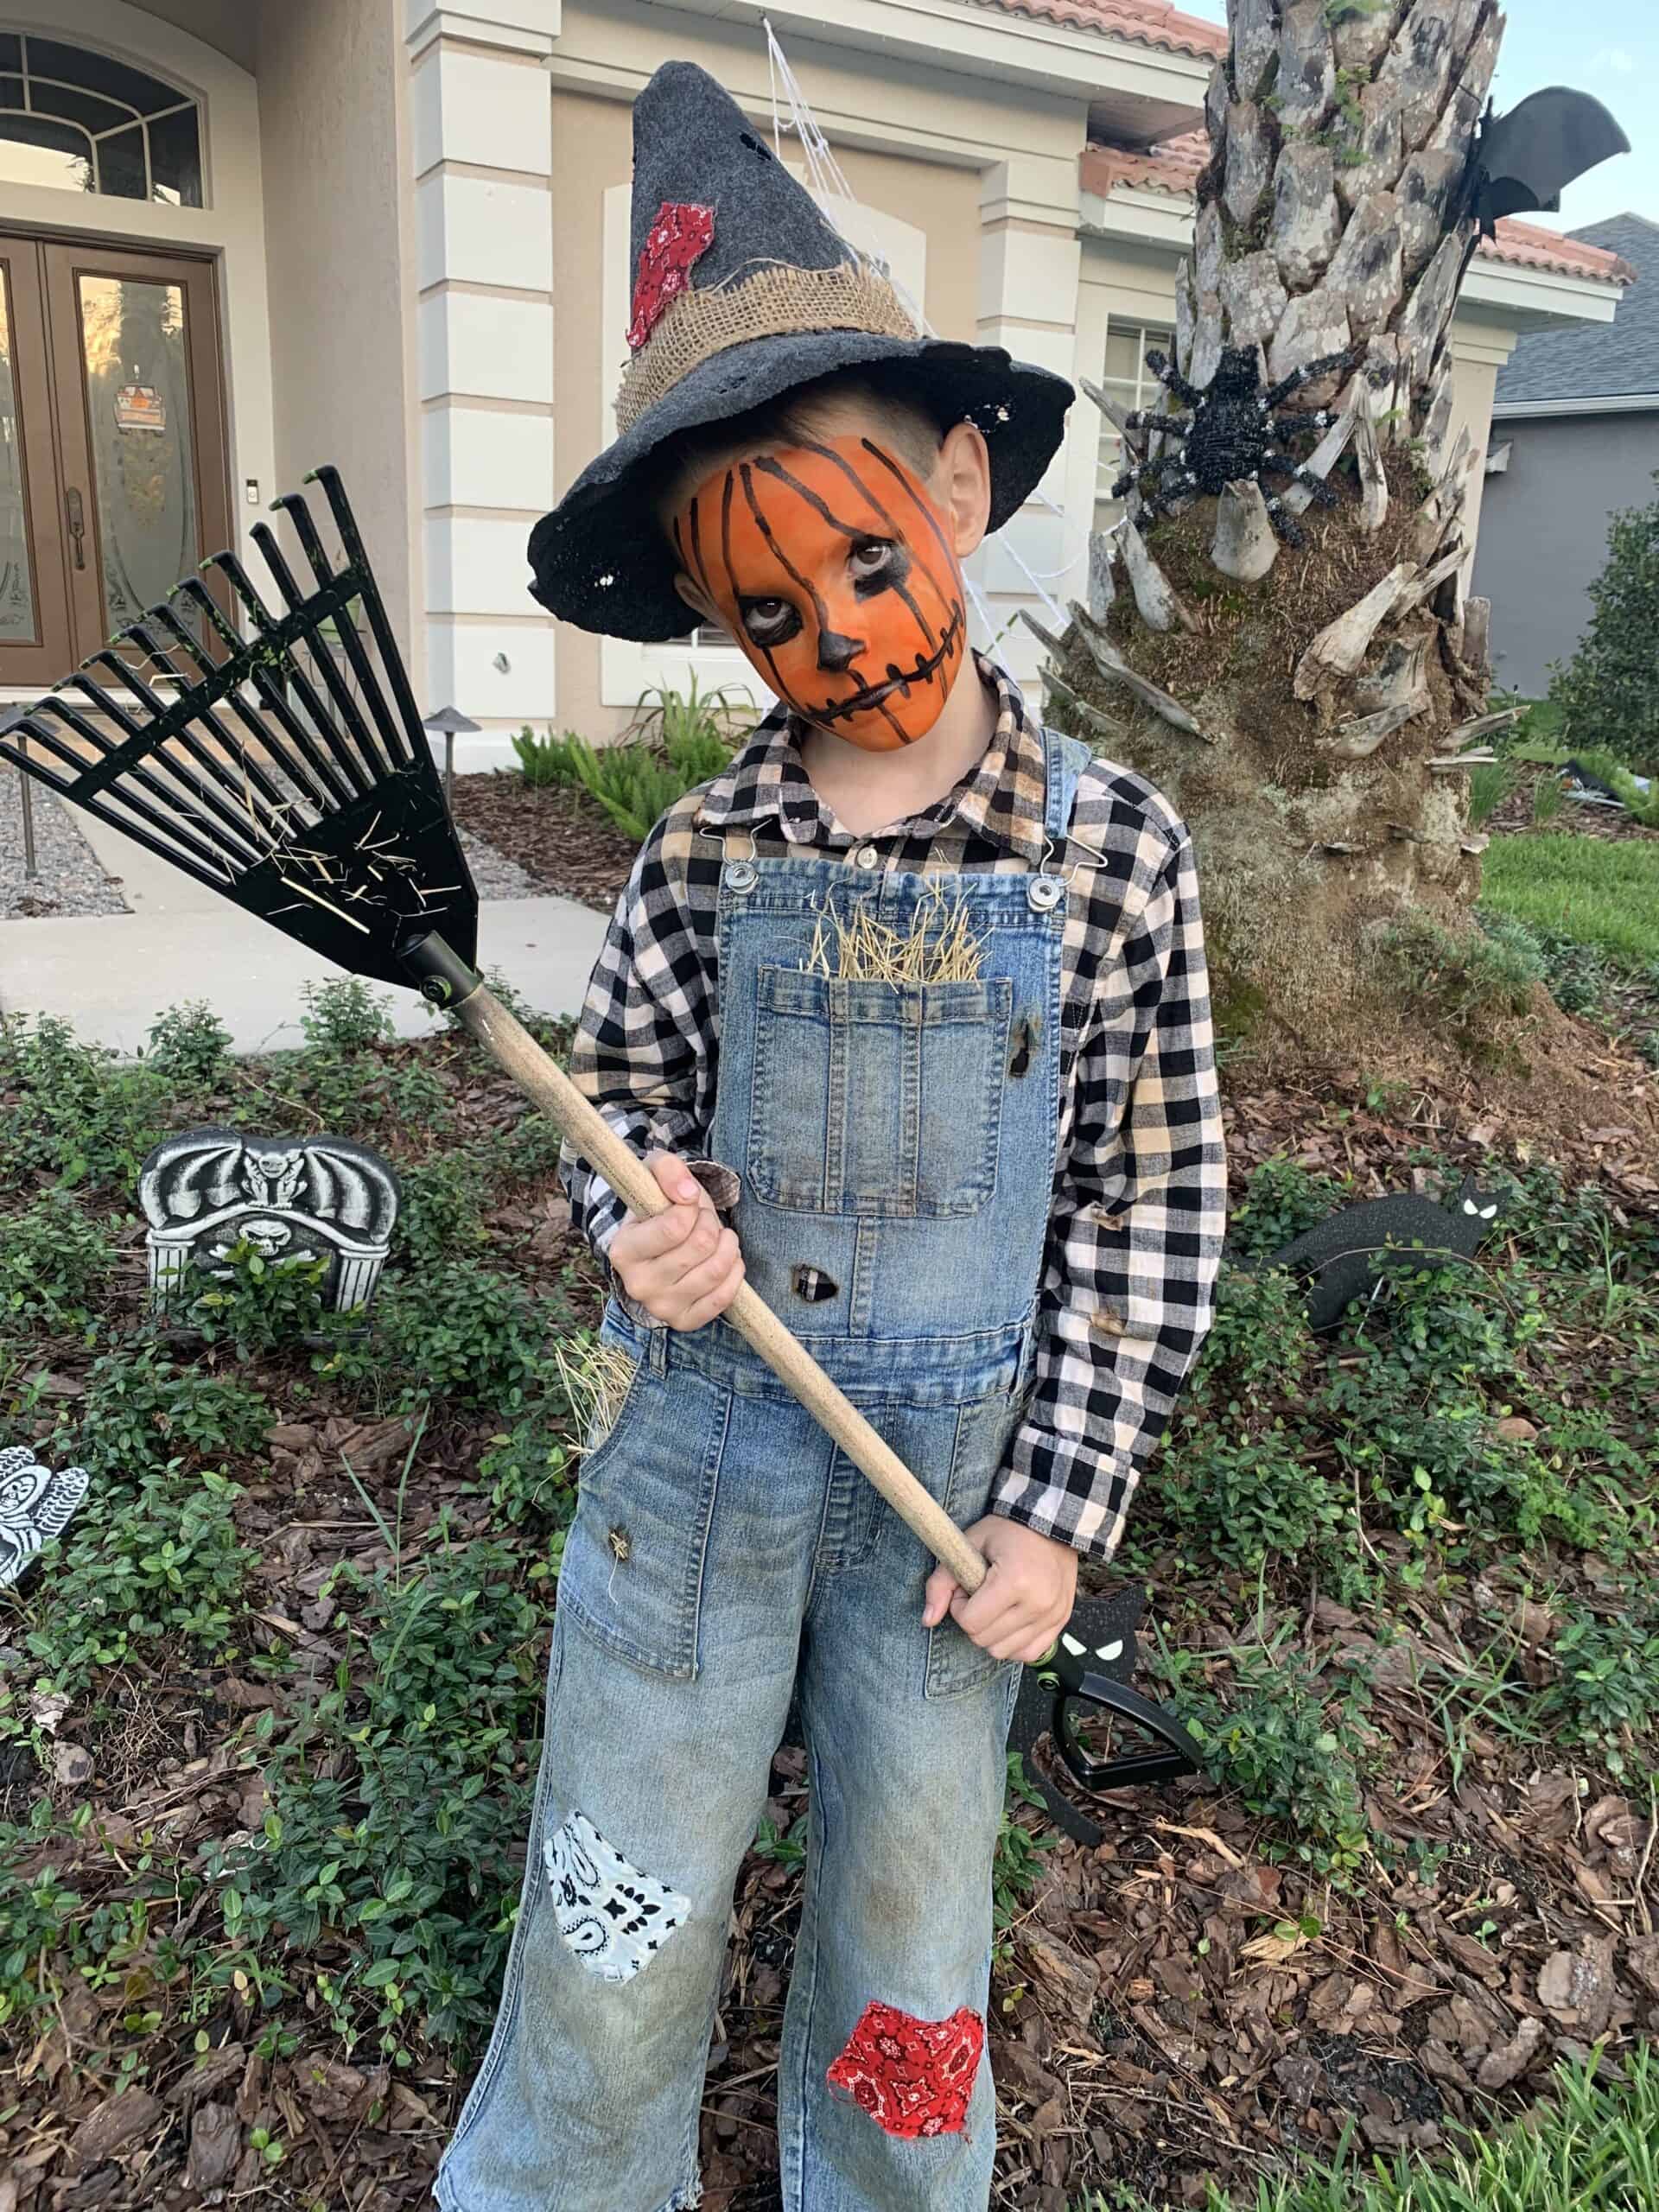
This is a great option for anyone needing a last-minute costume since it took minimal effort and was very inexpensive.
My son wanted to be scary this year, and came up with the idea to be a frightening pumpkin scarecrow.
For the hat, I bought a big piece of felt at the craft store and cut out the hat rim (make sure to measure the diameter of their head first!) and then cut out the cone shape and hot glued it all together.
I glued some burlap around the rim and glued a few patches on that I cut out from bandanas. To give it that old and weathered effect, I took a stick lighter and burned the rim of the hat and burned a few holes in other random spots (when working with felt, felt melts and does not ignite).
I bought the shirt and overalls at Goodwill and spent $6 total (score!). After I washed them, I filled a big bucket with some water and tea bags and soaked the shirt for about 3 hours.
Meanwhile, I filled a spray bottle with tea and sprayed the overalls all over. The tea helped give them a more yellowed and weathered appearance.
I dried them out in the sun and then laid them flat and rubbed wet coffee grounds on them in certain spots to give them dirty stains (I highly recommend doing both this and spraying the overalls outside since it does get messy!).
To make holes in the overalls, I burned a few spots with the stick lighter. Unlike felt, the denim will ignite but takes awhile.
As soon as it does, you can blow it right out and there will be a hole in the material (this step is completely optional!). For safety reasons, I also highly advise doing this outdoors.
I also glued on a few patches and stuck some hay in the pockets for added effect. The pumpkin face was done with orange and black face paint.
I recommend using a water-activated face paint as opposed to a cream.
It stays put better and doesn't smear once it's dry (I used a cream paint for Jack Skellington and there is definitely a difference!). The total time to make this costume took me about two days. Happy Halloween!
Mommy & Me Mickey Mouse DIY Halloween Costume by TBPM Editor-in-Chief Laura Byrne:
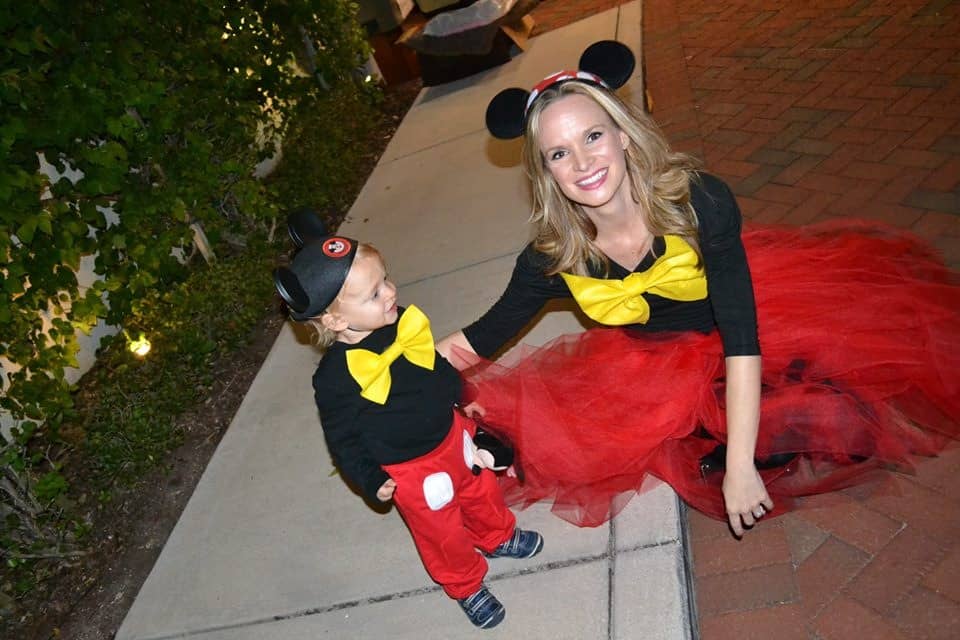
My little one LOVES Mickey Mouse, but hated wearing costumes, so we compromised with regular everyday clothes and a pixie dust twist!
I have probably created a version of this costume at least four times because it's so simple! All you need is felt, tulle, glue gun, and safety pins. I bought basic black shirts and red sweatpants for my kiddo and recycled a top from my own closet.
To create the bow ties, I simply took a sheet of yellow felt from the craft store and pinched it in the middle and wrapped with another strip of felt and secured with a glue gun. I made a smaller version for my son–about a half of a sheet of felt. We then used a safety pin to attach to the shirts.
For my son's Mickey pants, I cut out buttons from a sheet of white felt and glued those on. What you don't see in this photo is his cute tail which I cut from a sheet of black felt and glued to the backside of his pants. 🙂
It probably would have been easier to buy the red tulle skirt, but it was much more cost effective to DIY. I bought red tulle ribbon and tied them around a large red ribbon and wrapped into shirt. I wore it over a pair of black leggings just in case.
The best part about this costume is that it was actually comfortable to wear and when my son got tired of the bow tie, I was easily able to remove it.
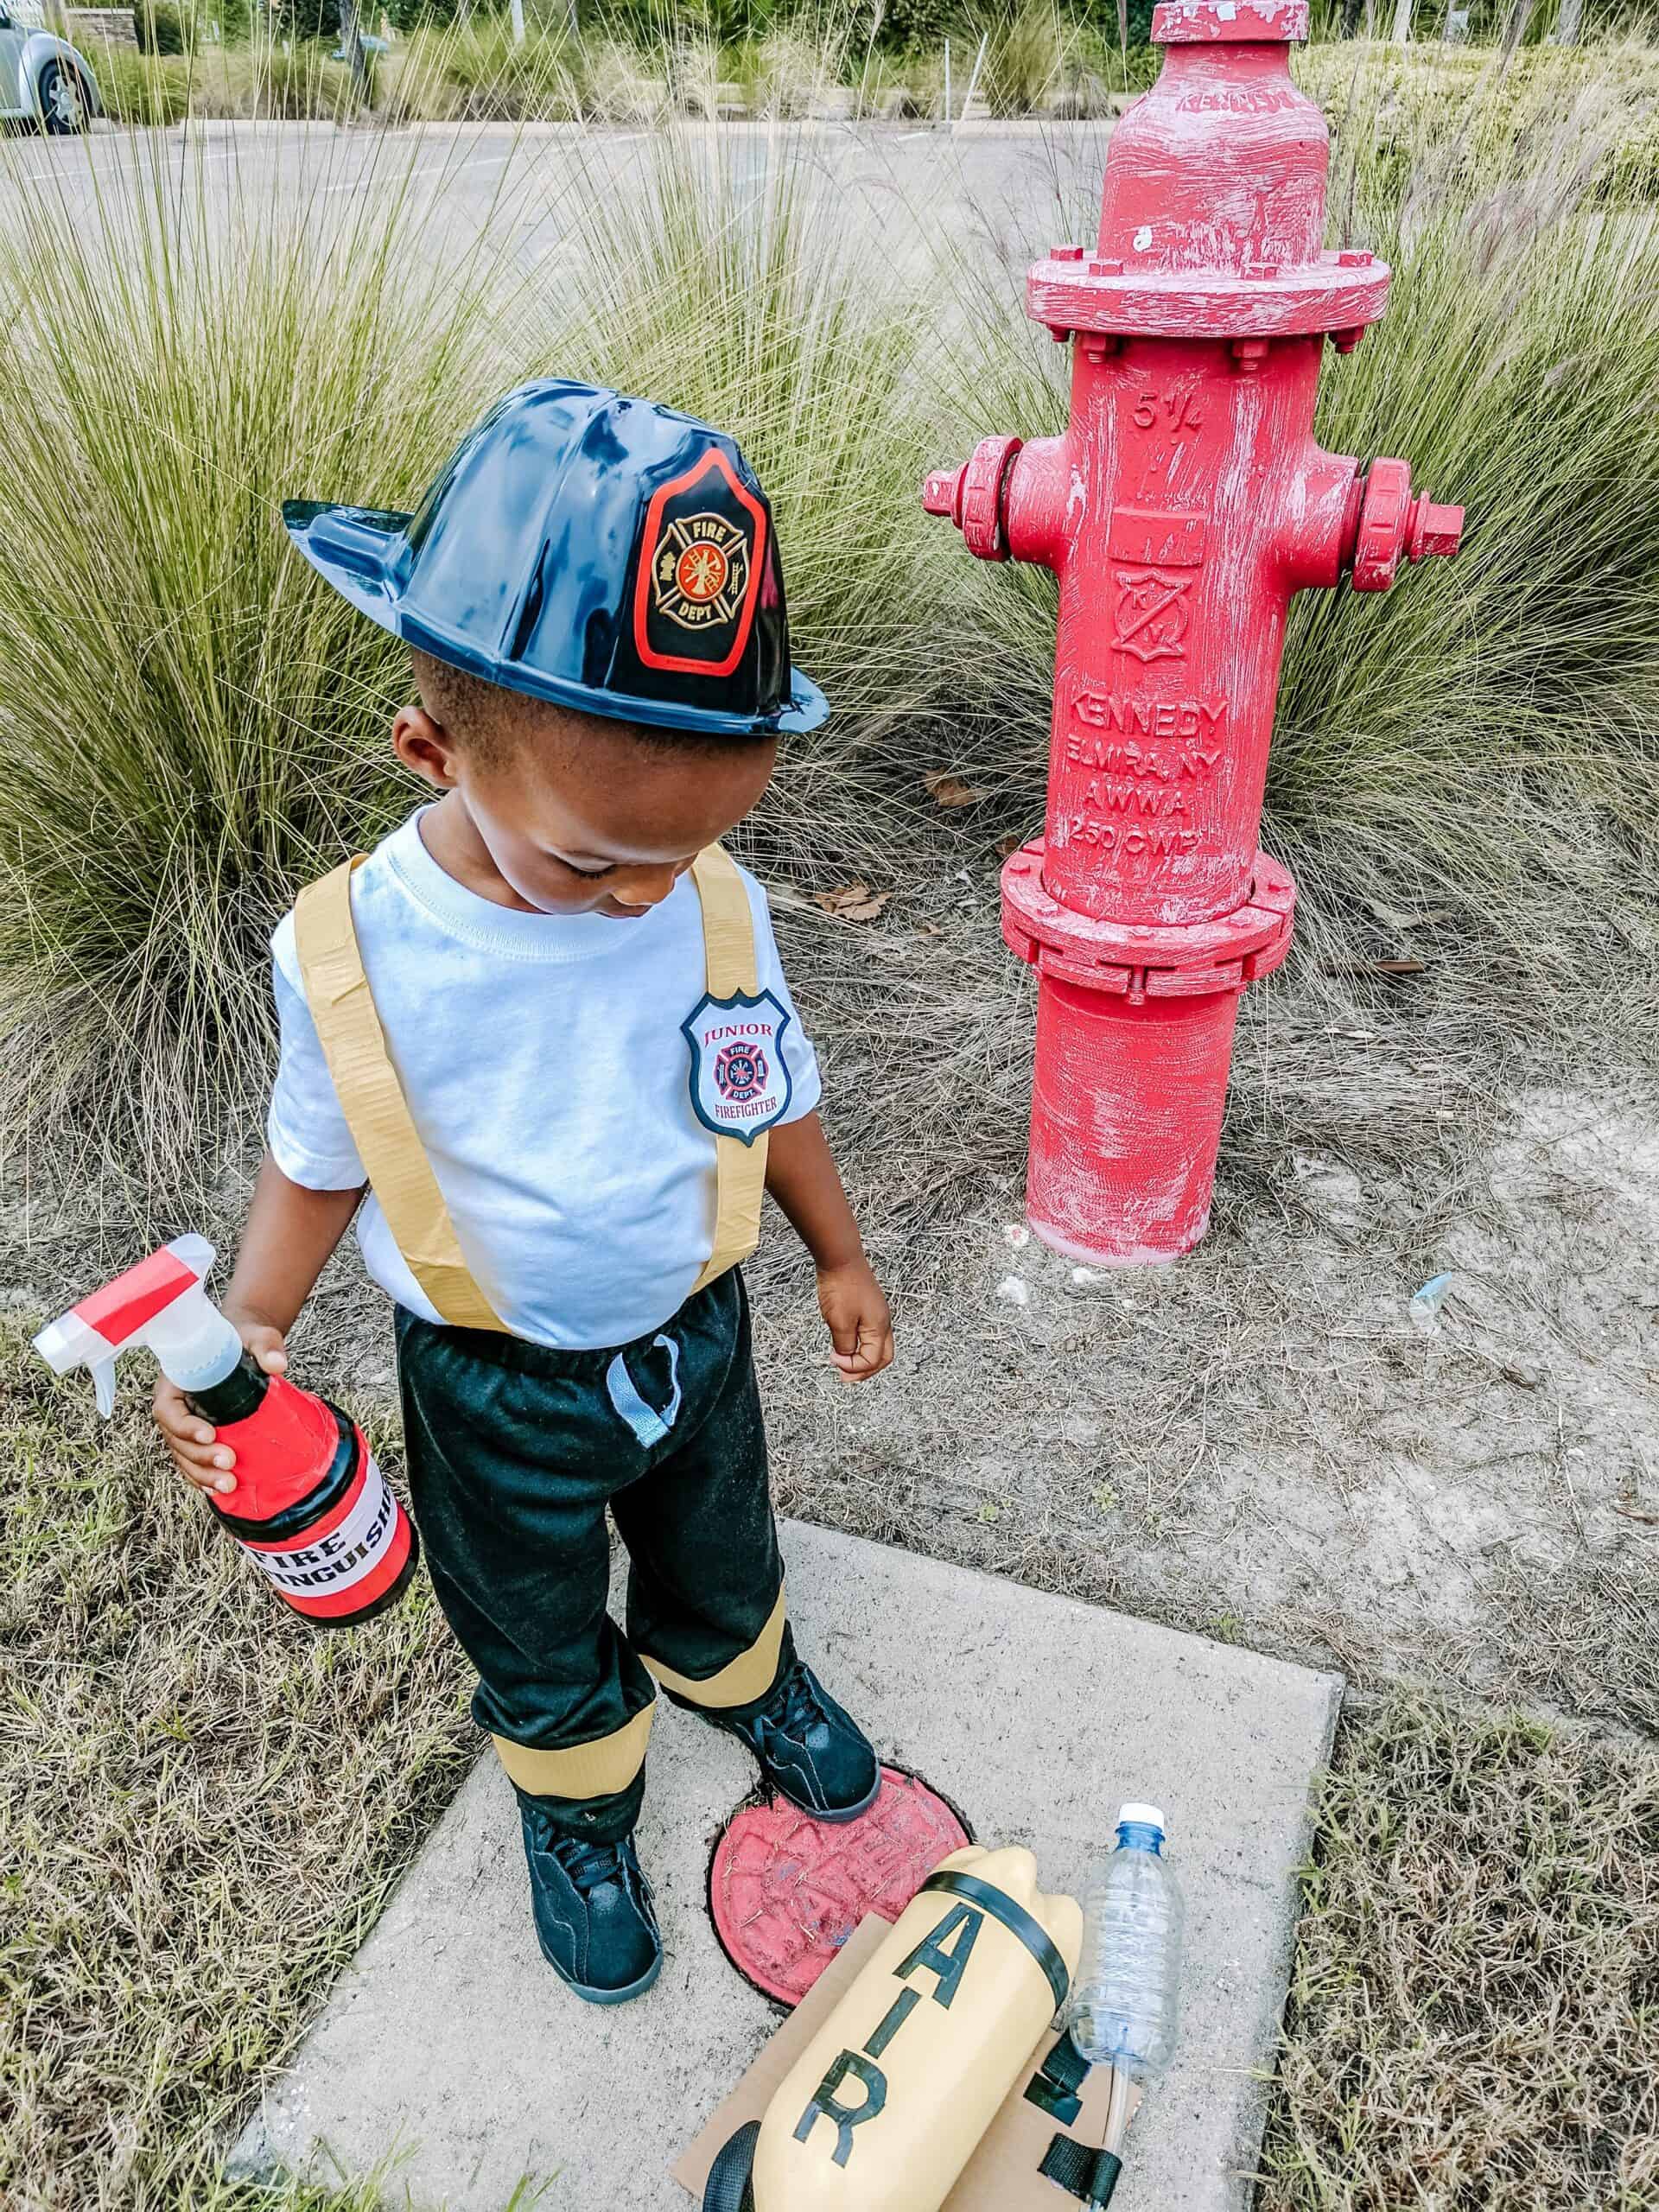
Dog Man Inspired Costume for Book-O-Ween:
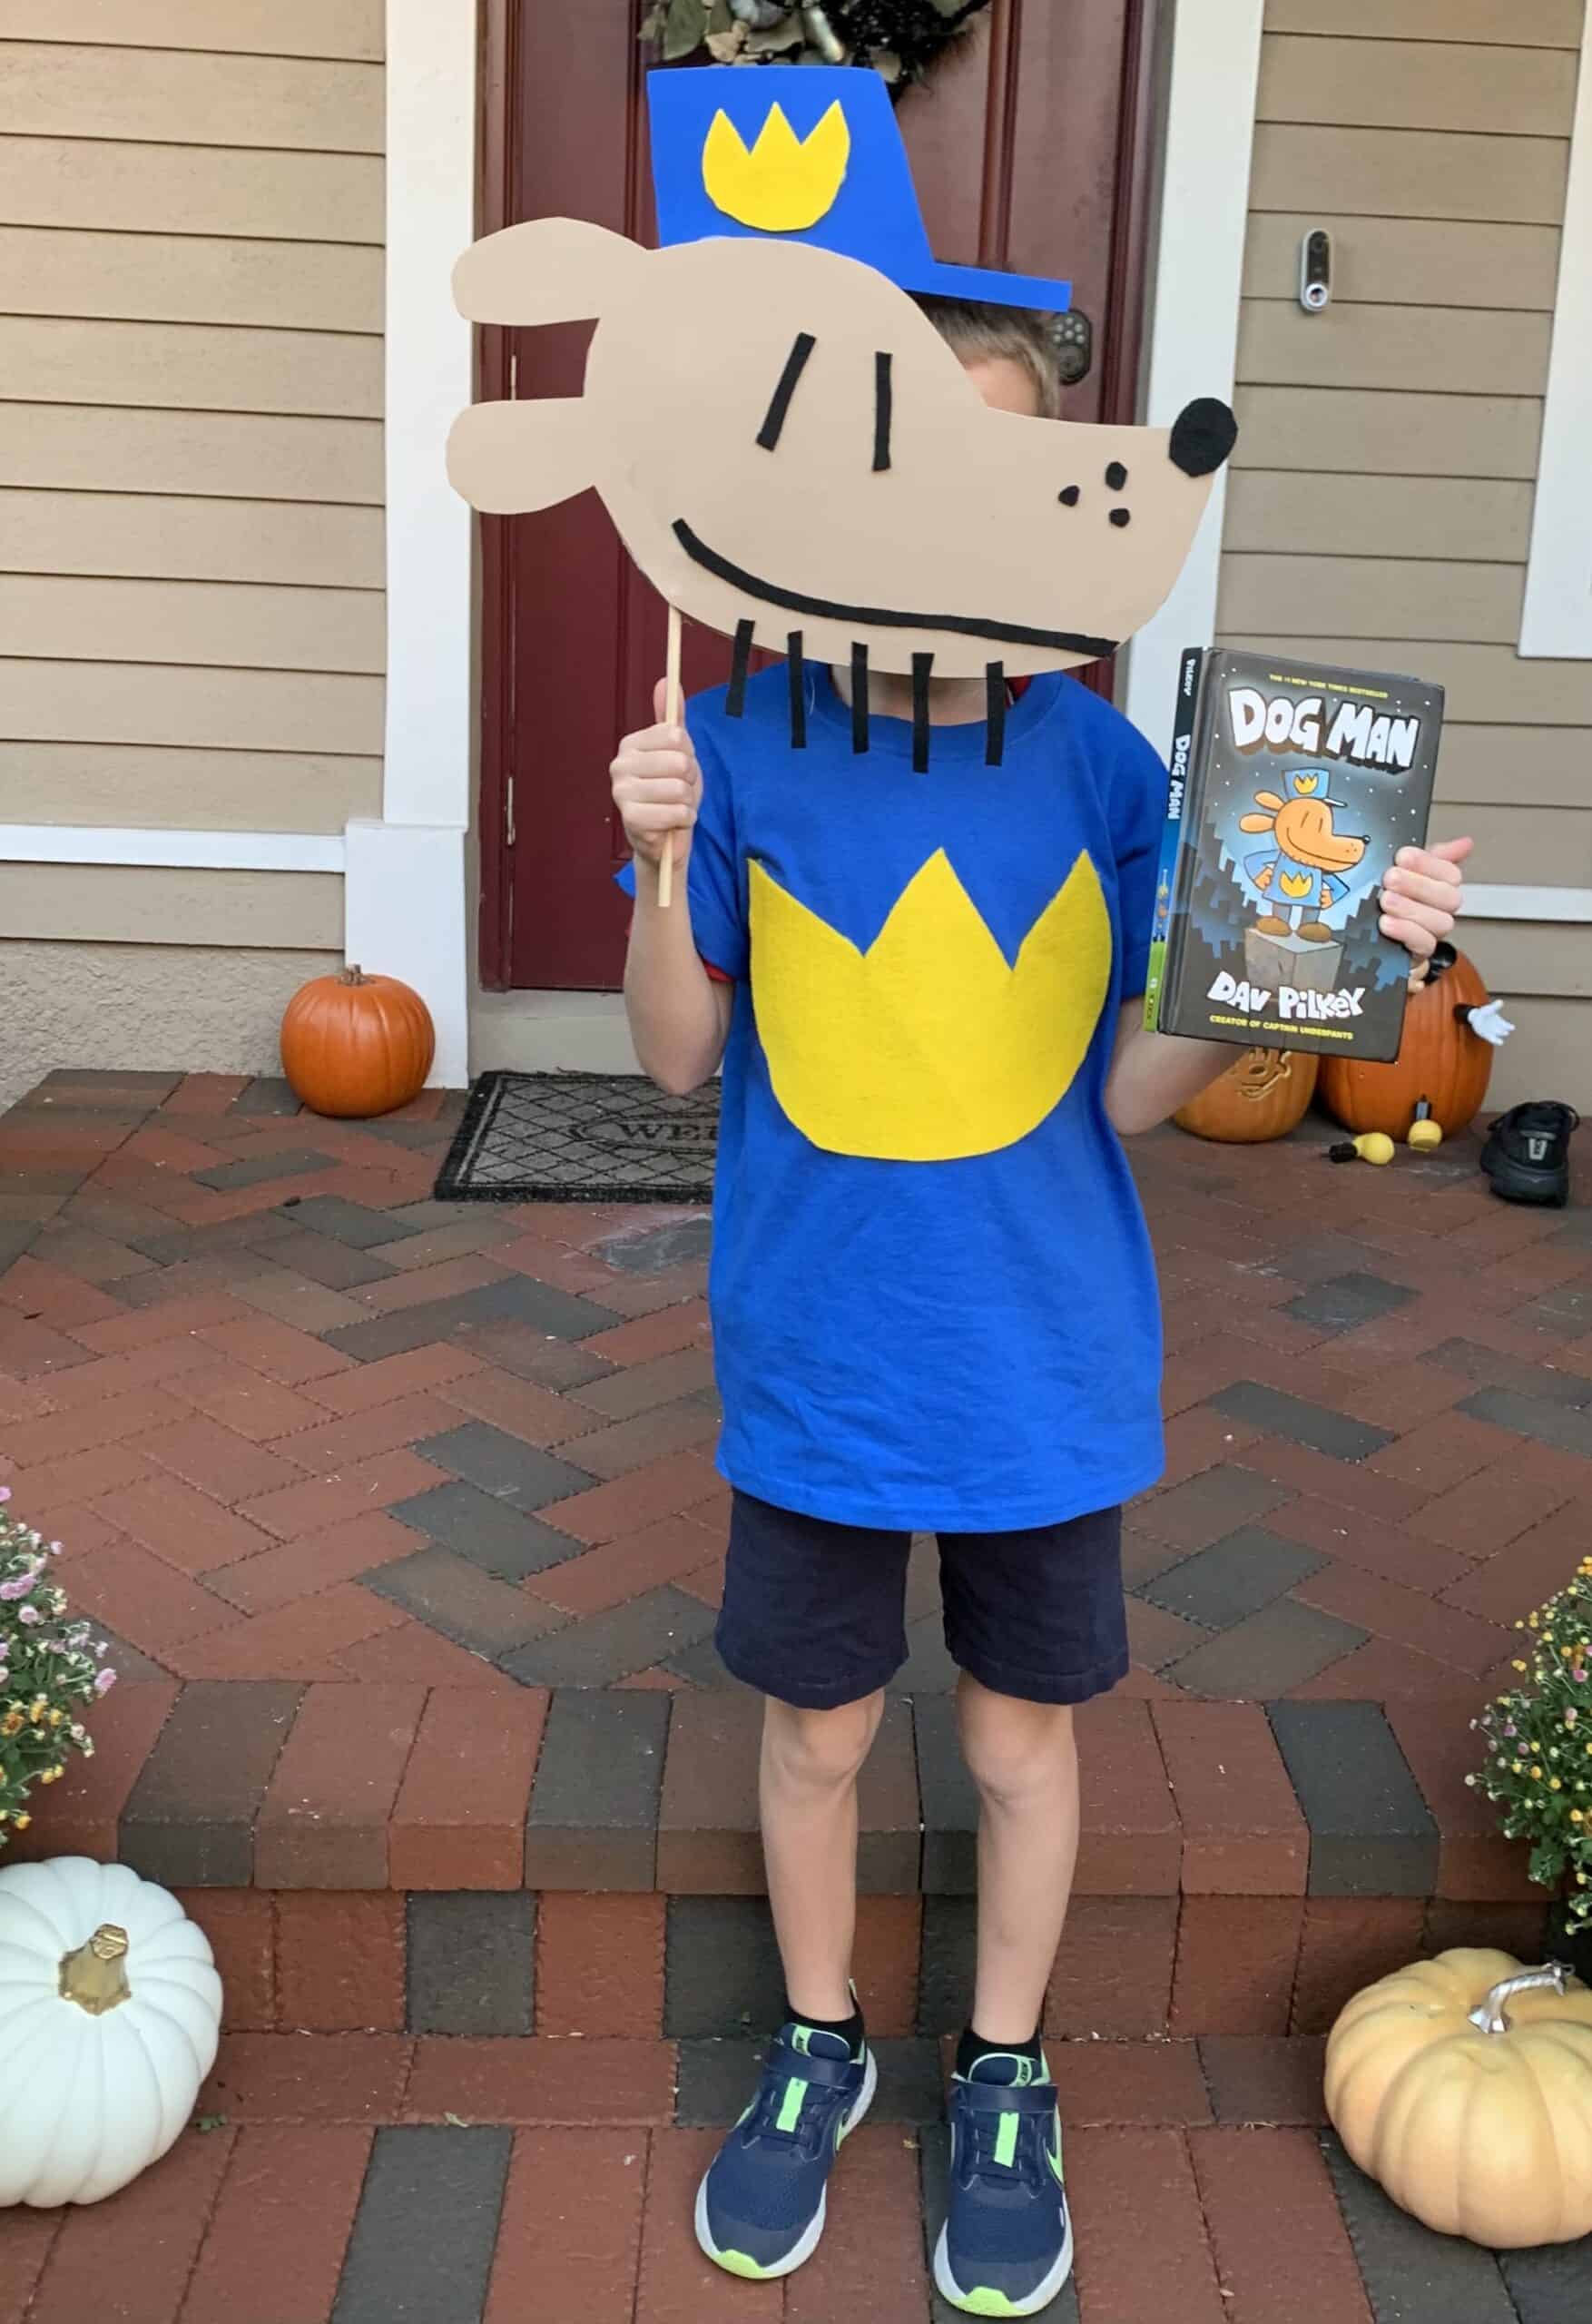
When your child comes home and requests to be the character from his favorite book and there is no costume to be found…you improvised! I turned to Pinterest for some inspiration and we came up with this twist on Dog Man.
We put a sheet of yellow felt to use again and cut it into the shape of the badge for his shirt and then rather than making a mask or decorate a hat, we made a Dog Man head out of a foam sheets and glued them onto a wooden stick.
It was cute for his class picture and Book-O-Ween parade and didn't interfere with his school day or face mask which was required at the time.
MORE Book-O-Ween Costume Ideas from Karimah Henry
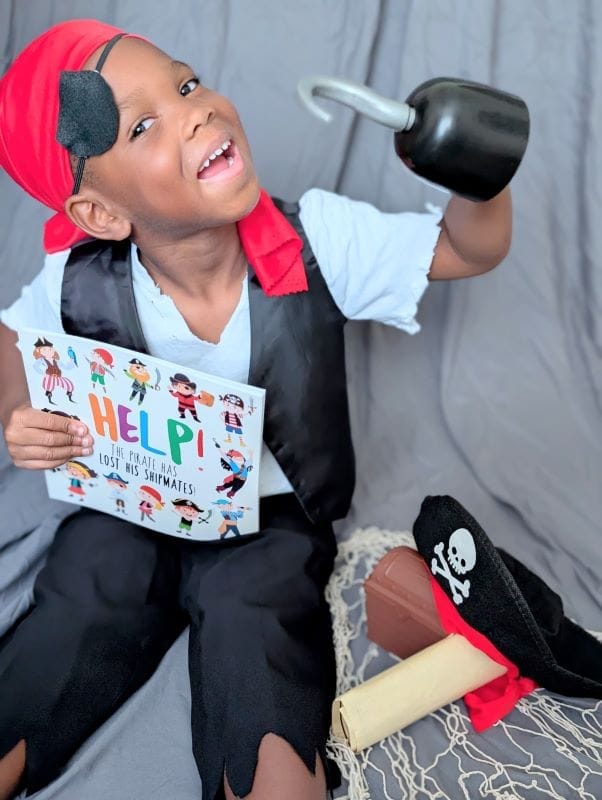
DIY Pirate Costume based on “Help! The Pirate Has Lost His Shipmates!” (or any pirate book child owns)
Supplies:
- Plain white shirt or striped white shirt
- Black shorts, pants, leggings or skirt
- Red bandana
- Black vest
- Pirate temporary tattoos
- Pirate hat (optional)
- Red fabric (for the headscarf or belt)
- Eye patch
- Toy sword or hook Directions:
- First, dress your child in a plain white or striped white shirt and black shorts, pants, leggings or skirt.
- Next, add a bandana or red headscarf to your child’s head.
- Finish the costume by adding a black vest, temporary tattoos, and an eye patch. They can carry a toy sword or hook with their book as they march in the parade.
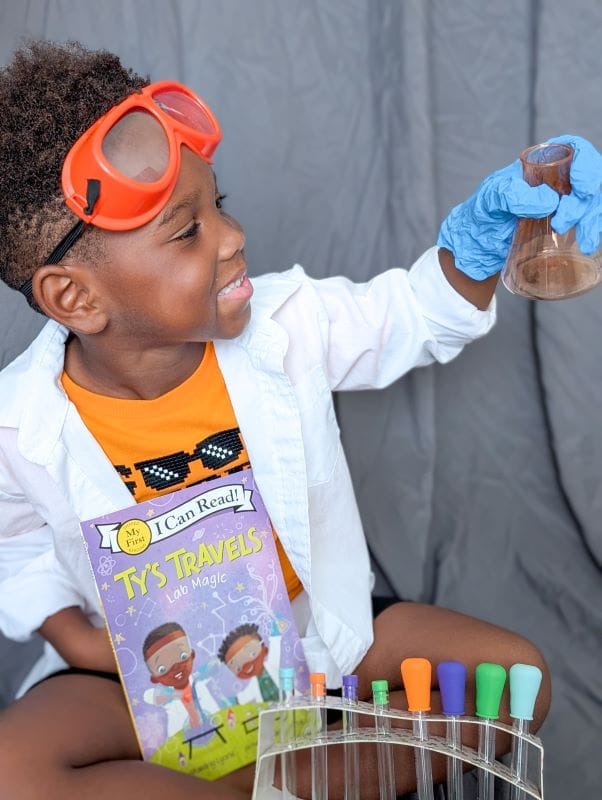
DIY Scientist Costume based on “TY’s Travels…Lab Magic” (or any science book child owns)
Supplies:
- Oversize white button up long sleeve shirt
- Goggles or safety glasses
- Khaki pants
- Orange shirt or plaid button-up shirt
- Clear vinyl badge holder lanyard & name card (optional) Directions:
- First, dress your child in an orange or plaid button-up shirt and khaki pants.
- Next, add the oversized white button-up long-sleeve shirt, and then roll up the sleeves.
- You can make a badge by writing your child’s name on cardstock or index card. If you’re feeling fancy, add a small picture of your child to the badge.
- Place the badge inside the vinyl badge lanyard. Have your child wear it around their neck.
- Finish the costume by adding the goggles or safety glasses. They can carry a plastic flask along with their book as they march in the parade.
Magician DIY Halloween Costume by TBPM Contributor Karimah Henry of @craftingafunlife from our October 2021 issue:

Karimah shared this adorable DIY costume that is easy to make and still allows your child to wear normal, everyday clothes! Here's what she shared to make this DIY Halloween costume:
Supplies
- Red felt fabric sheet
- Glue gun with glue sticks
- Black cape
- White shirt (dressy or casual)
- Black pants (dressy or casual)
- Wooden dowel (7/16″ in diameter and 12″ long)
- Electrical tape
- White tape
- Black top hat
- Scissors
- Velcro sticky back coins
- Shoes (dressy or casual)
Directions to Make Bow Tie
- Start by cutting your red felt fabric sheet into 5-by-9-inch strips. You’ll also need a smaller piece of felt that is 2-by-4
- Pinch the larger rectangle in the middle to create nice, neat
- Wrap the smaller strip of felt around the pinched middle Cut off any excess fabric.
- Use the glue gun to add a small dollop of hot glue to the strip on the back side of the bow to secure Let dry for a few minutes.
- Finally, attach the Velcro sticky back coin to the back of the bow The other side will be attached to the cape when it’s time to dress up.
Directions to Make Magic Wand
- Start by wrapping your wooden dowel with the black electrical Leave about an inch at the top.
- Finally, cut a piece of white tape and wrap the top of the wooden dowel to complete your magic
Dress your child with a white shirt and black pants for this DIY magician costume. You can make it dressy or casual. Use what you have at home or visit your local thrift shop. Wrap the black cape around your child’s neck, then attach the felt bow tie. Complete the look with the plastic top hat and DIY magic wand. Your child is ready to celebrate Halloween!
Karimah shared these other DIY Halloween Costumes from over the years:
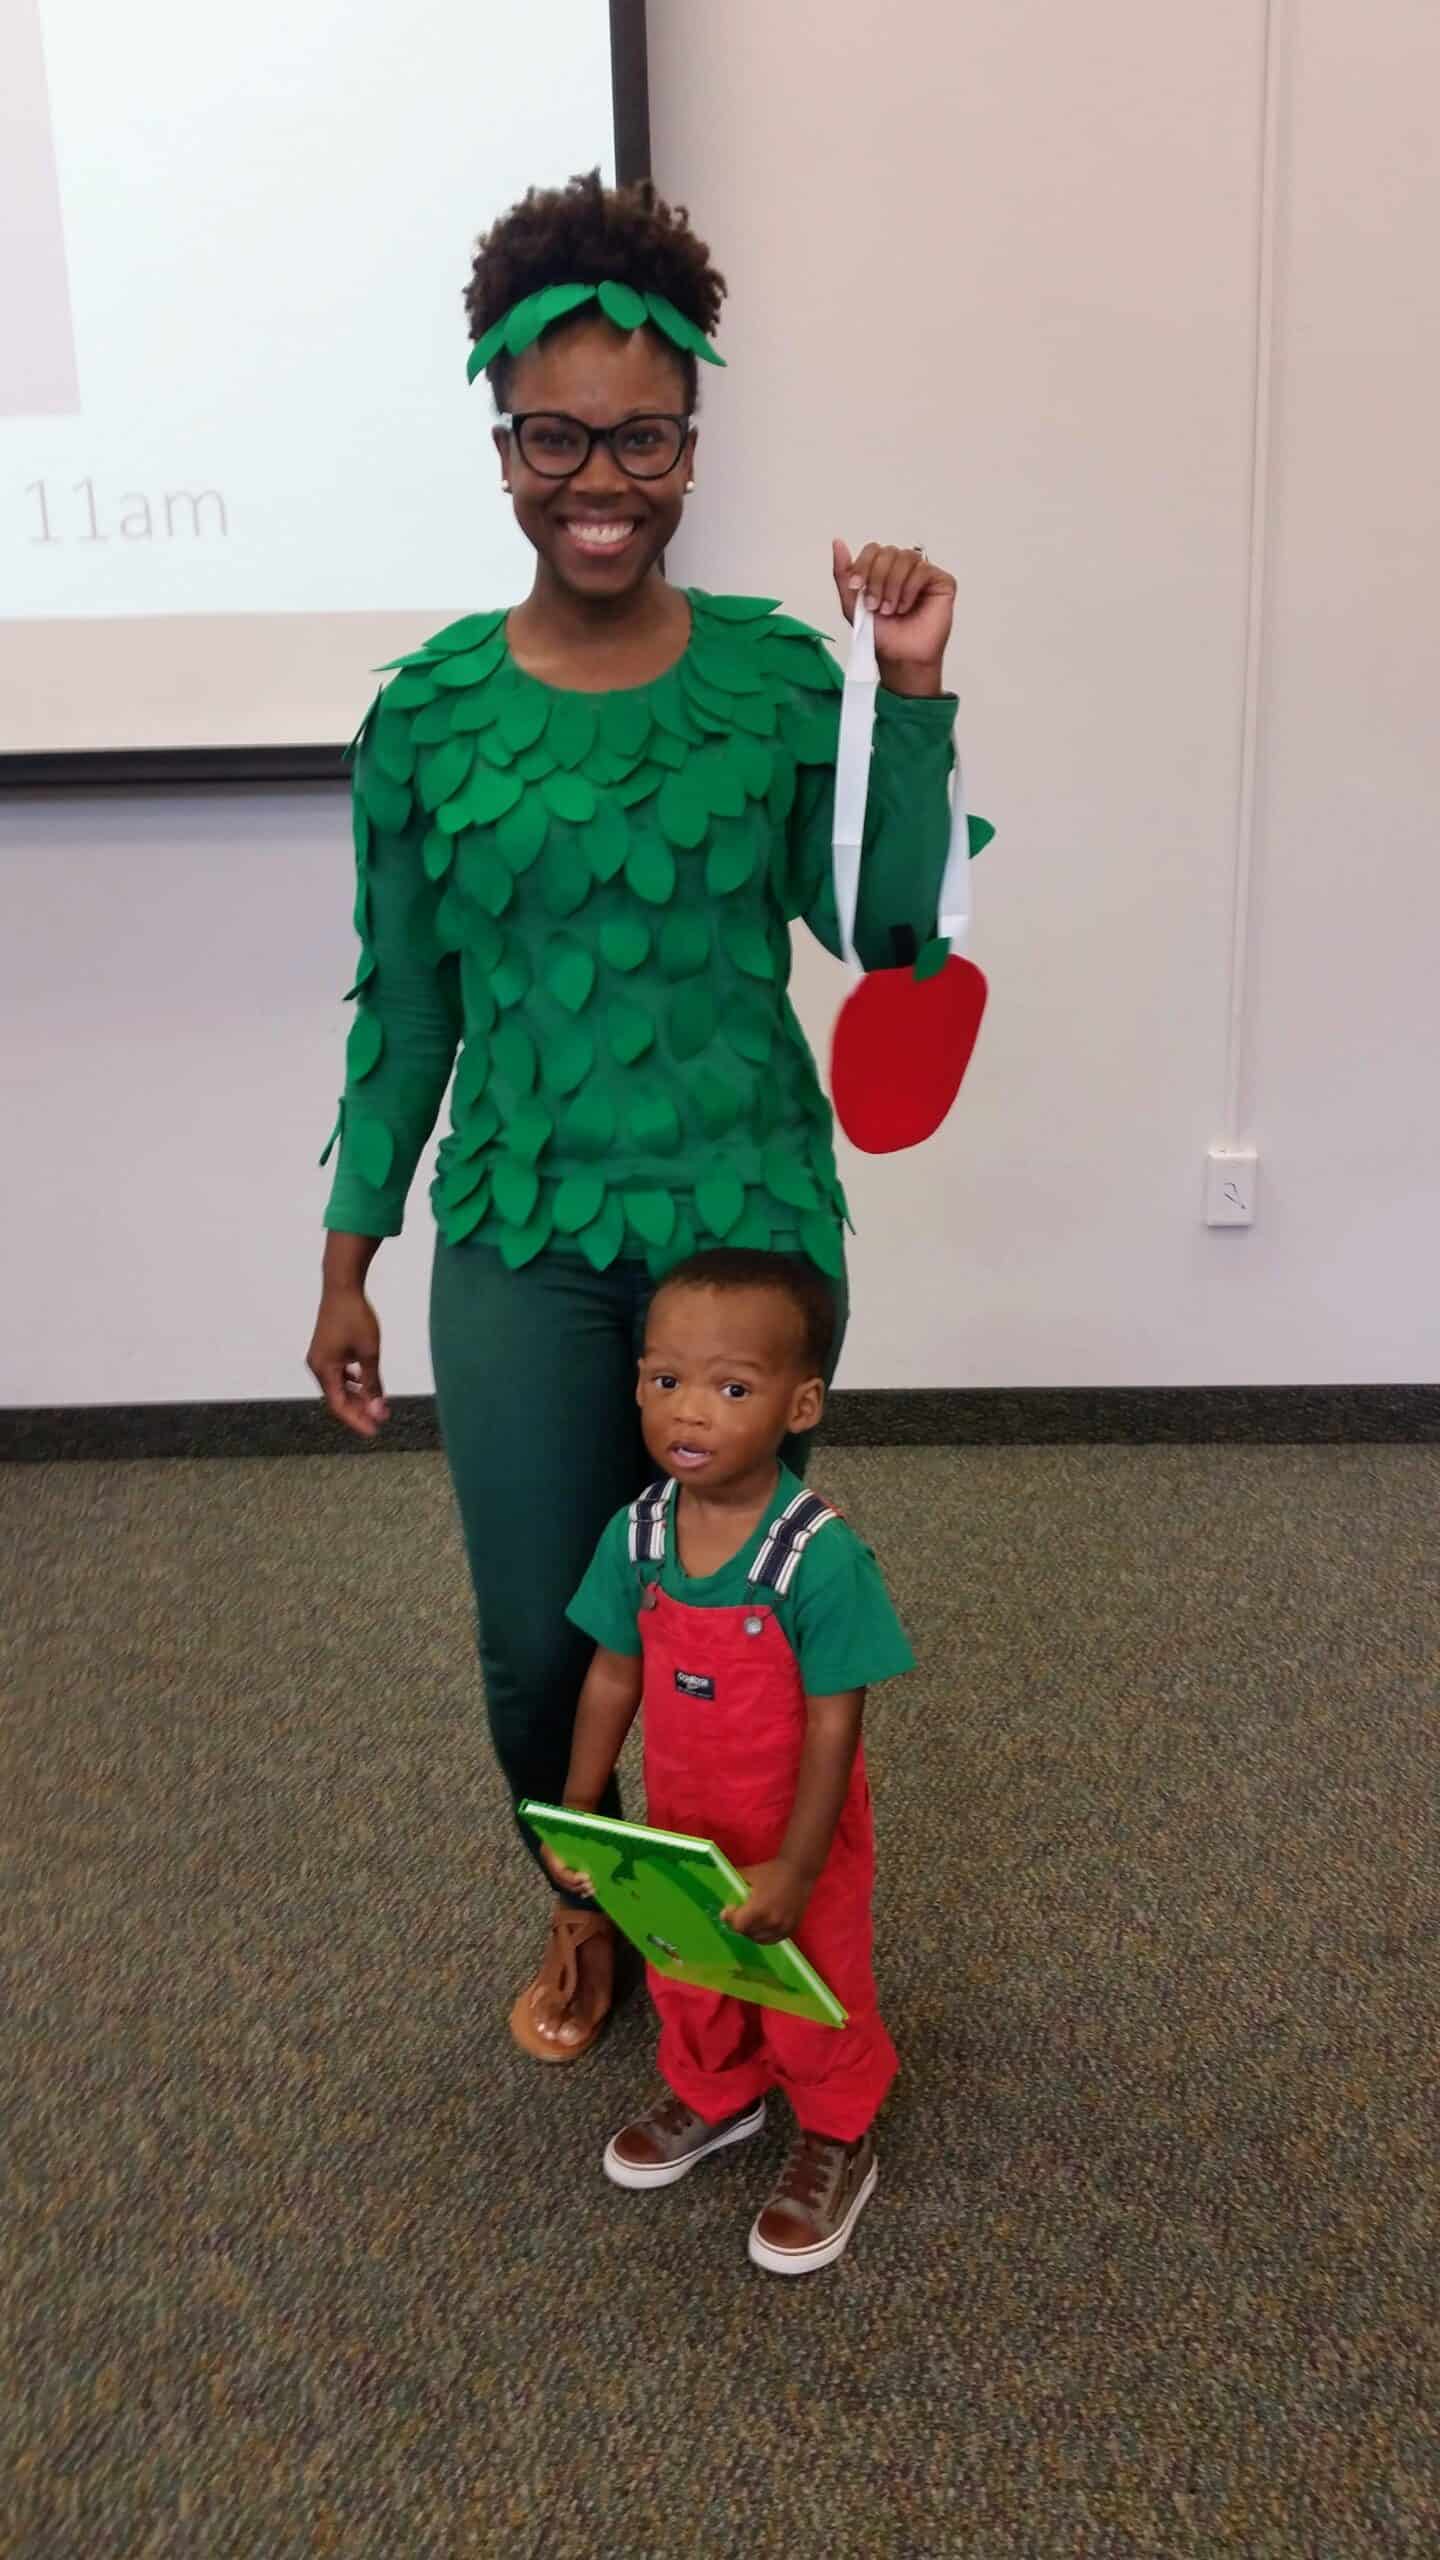
How cute is her DIY The Giving Tree Costume??
See more Halloween crafting ideas by Karimah Henry here!
Addams Family DIY Halloween Costume by TBPM Contributor Tara Payor, PhD
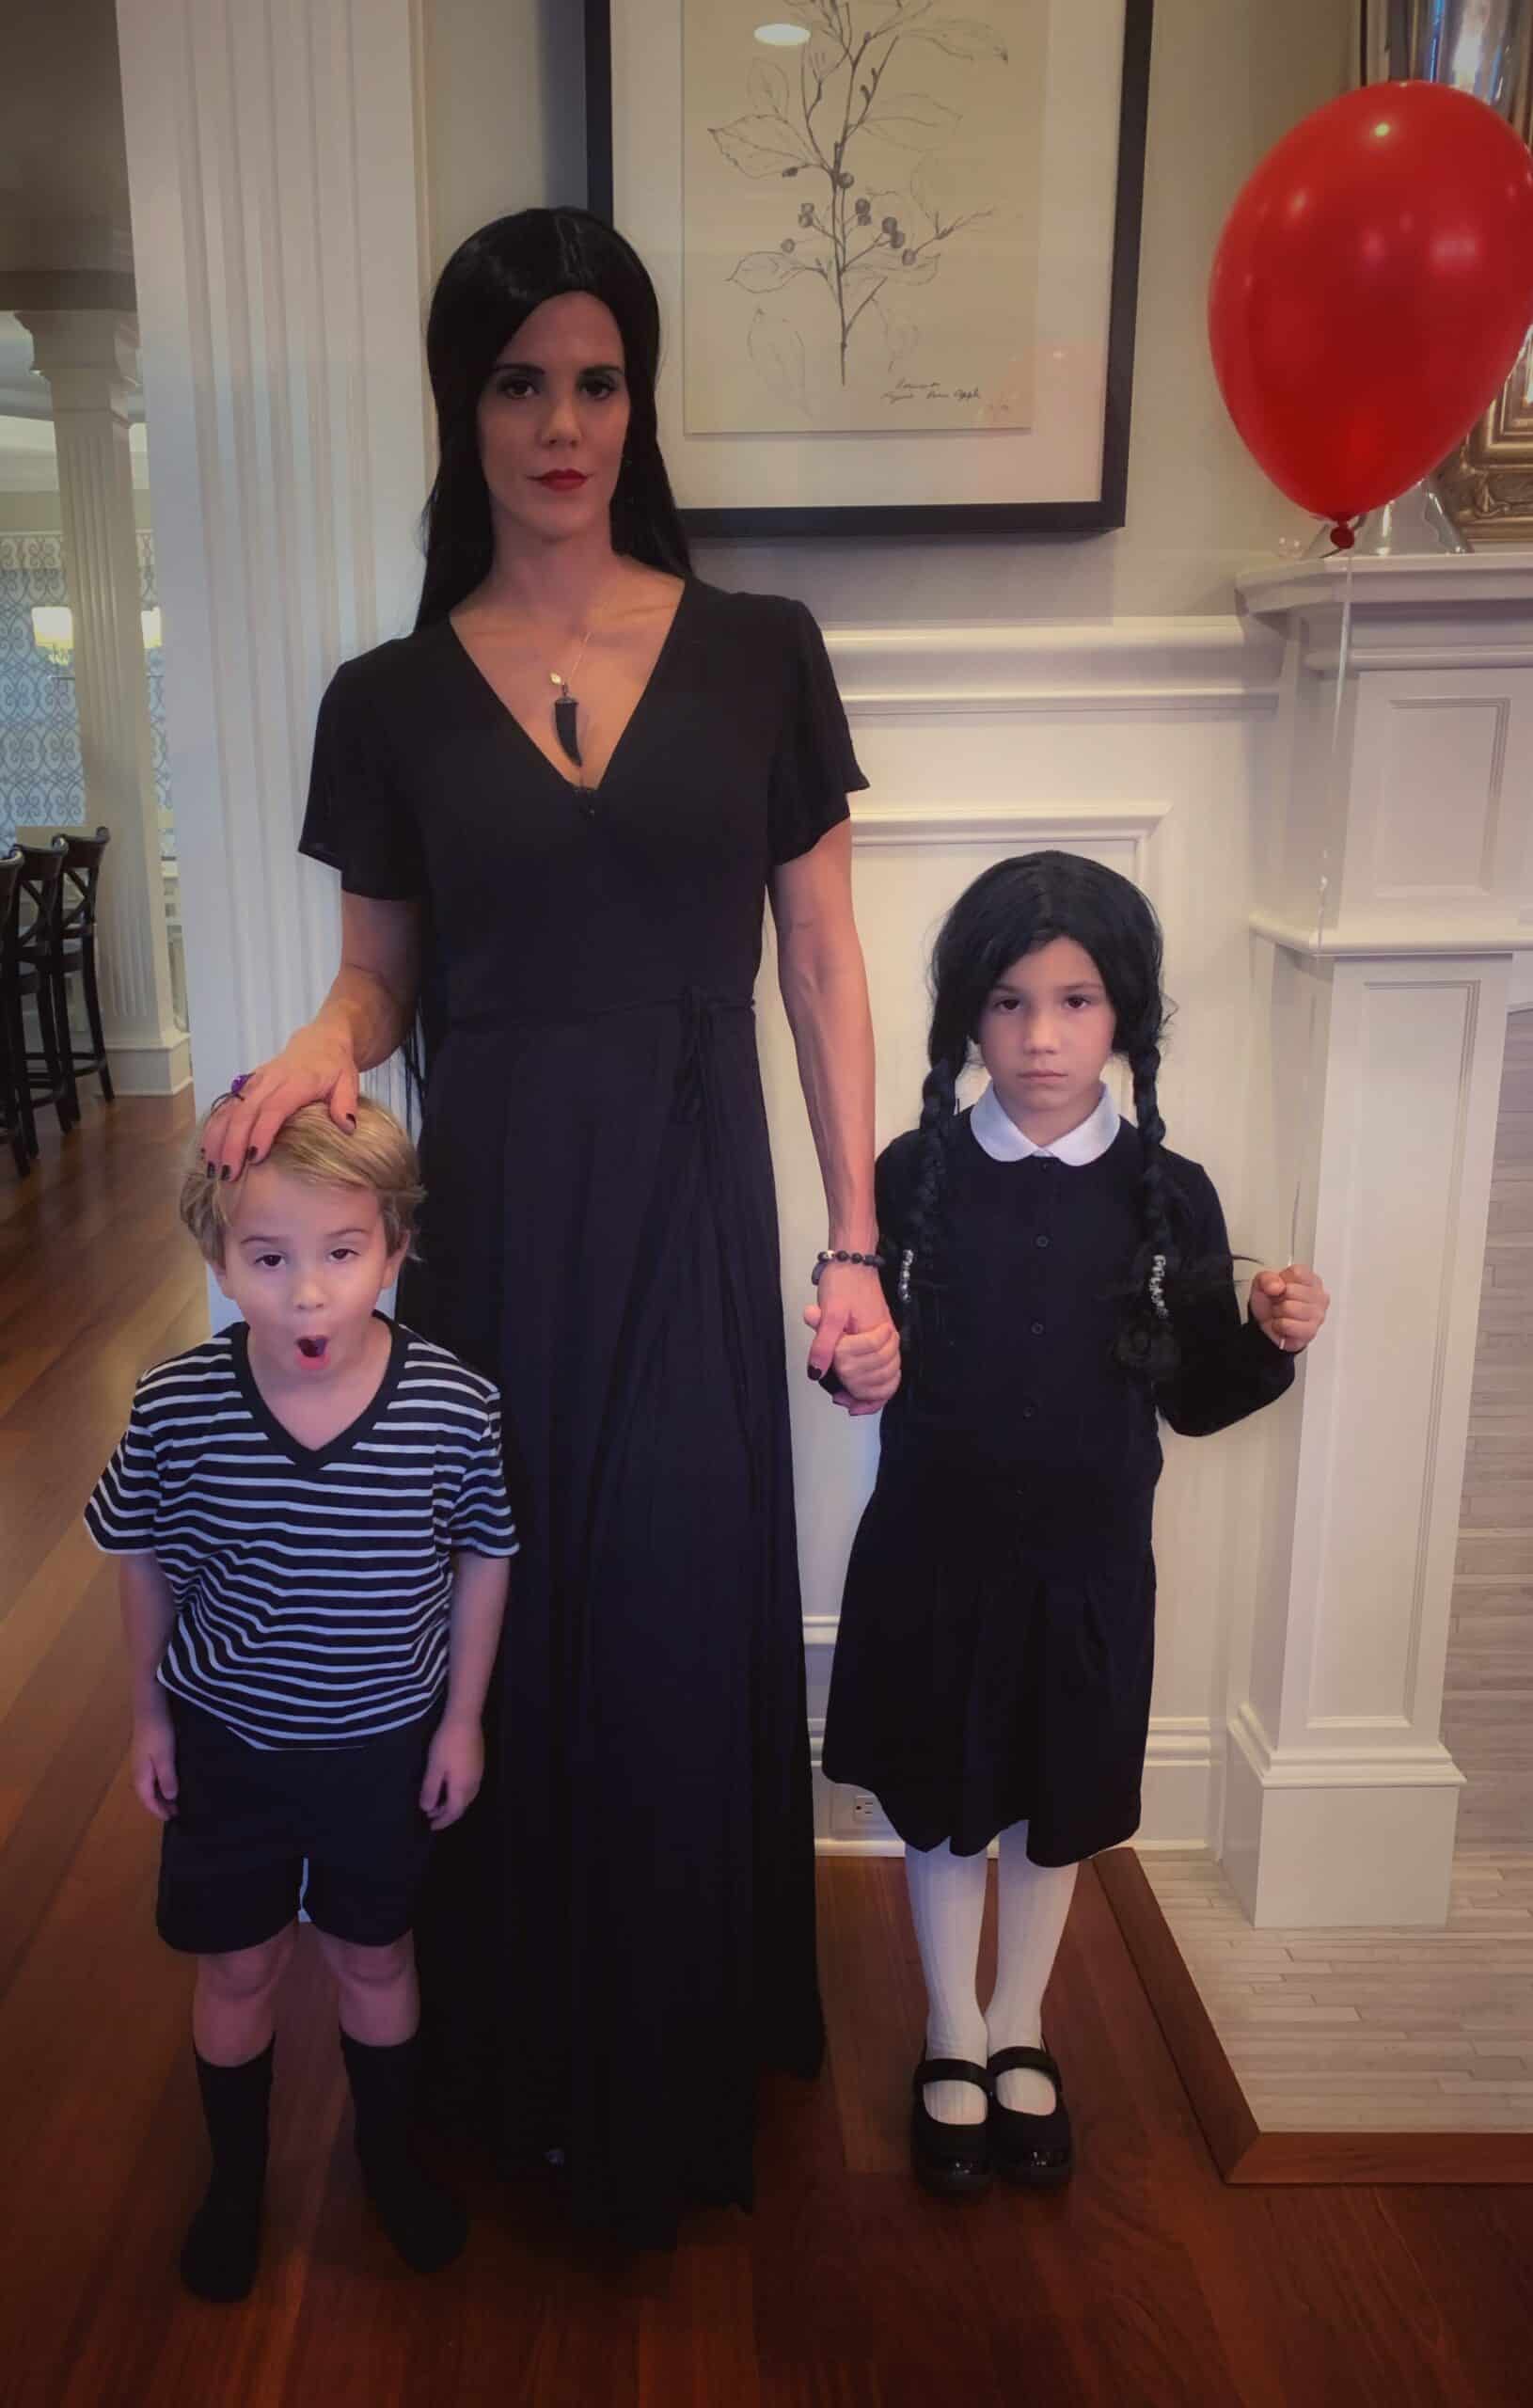
I love Halloween, but it can get expensive. I love integrating pieces we already have with ones we can wear again.
For our Addams Family Halloween, I ordered items from a treasured site, Primary.com. The kids got so much use out of their individual pieces after Halloween!
I got myself a black dress from one of my go to sites, Lulus, and I’ve worn it to both work and dinner.
We have to consider the typically hot Halloween weather in Tampa Bay, so the full on wool costumes don’t work for us anyway.
A couple of inexpensive wigs on Amazon, are perfect finishing touches.
Scooby Do Inspired Mommy & Me Costume:
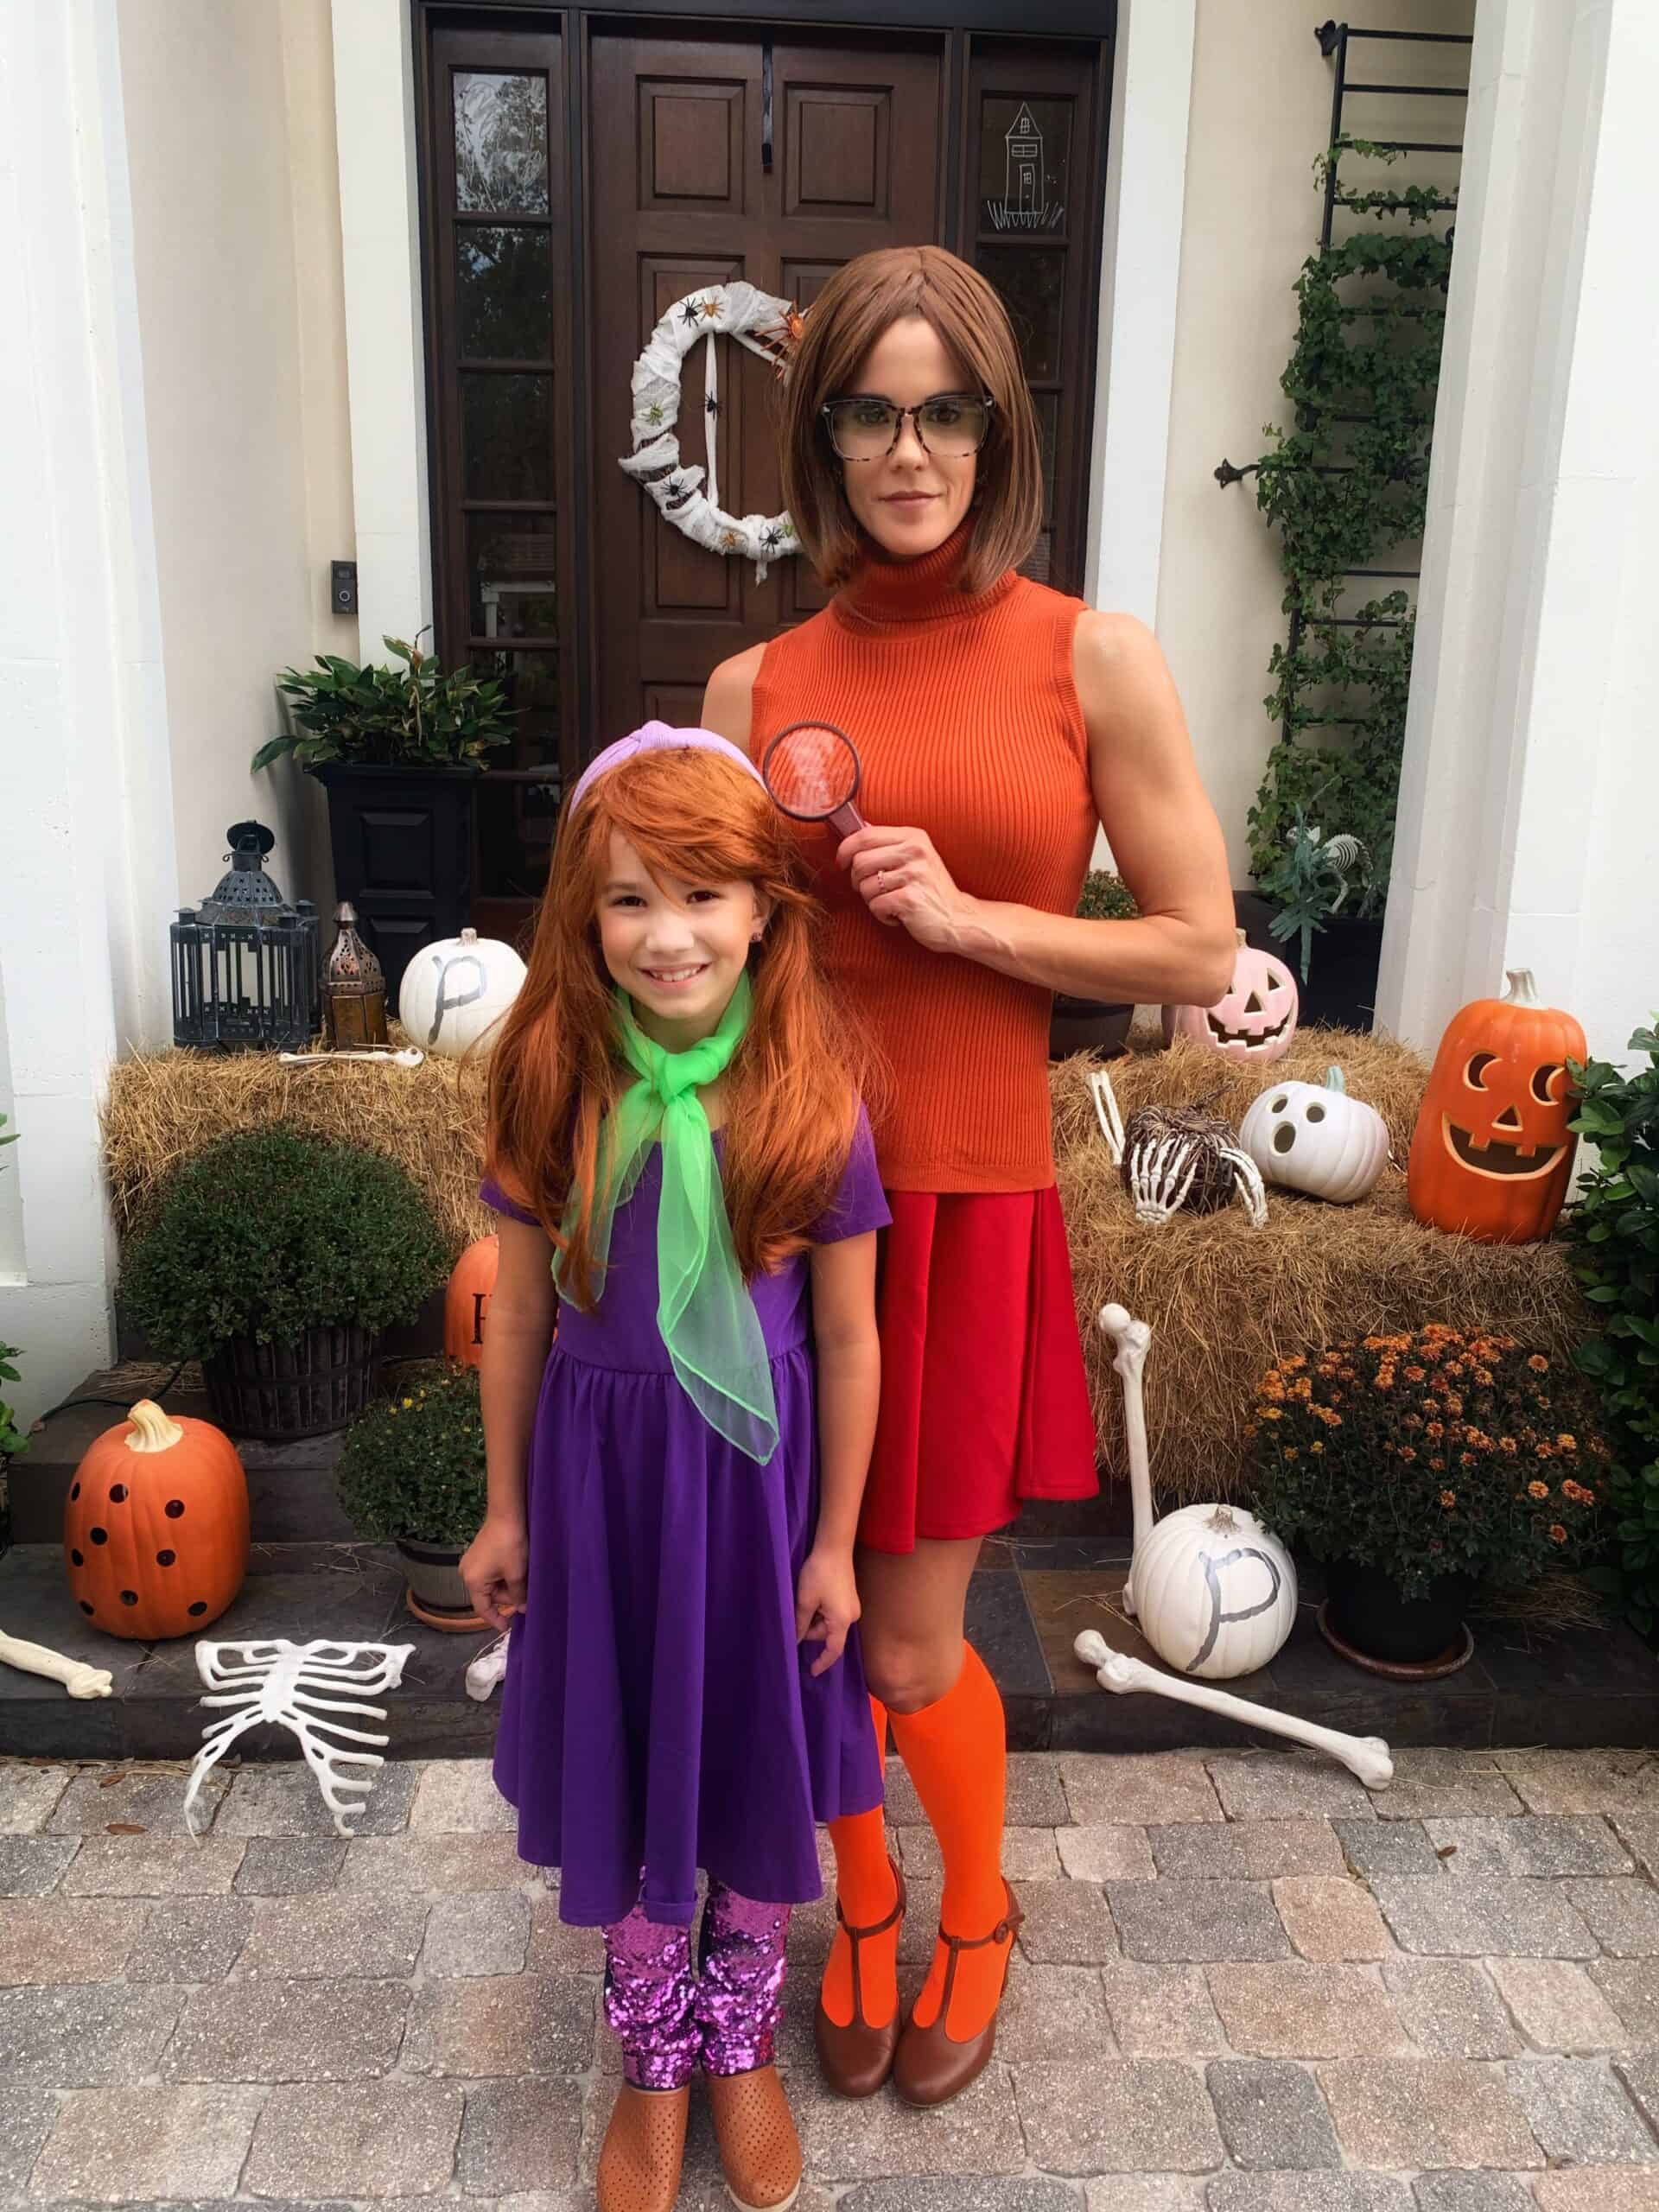
My kids were all in for a Scooby Doo theme. Combining pieces we had on hand with a few new accessories was simple and inexpensive.
I love solids, and I find they have lasting power (equals, we can wear them again and again). My daughter’s Daphne dress has made appearances many times after trick or treating. It’s also more comfortable than many of the thick, itchy costumes.
I go through accessory drawers in the house and typically find I have pieces like scarves and headbands to complete a costume. My daughter had light blocking glasses from online schooling I used to round out my Velma look. I bought the magnifying glass (which has actually been put to use) at Walgreens and paid under $20 for wigs on Amazon.
No one in Tampa is wearing a true turtleneck on Halloween, so improvise and make the look work for our climate and your budget.
E.T. DIY Costume with Anu Varma Panchal:
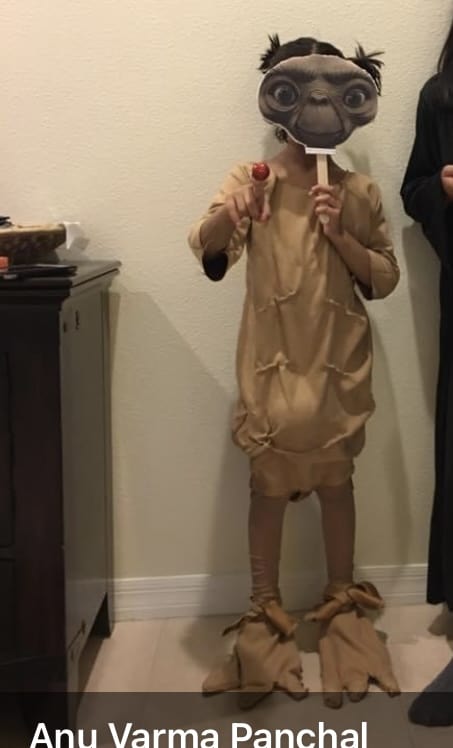
This is one I did a few years ago after my kids watched ET and fell in love with the movie. I sewed the costume our of brown felt (but the legs look like chicken feet!) and the red thing on the end if her finger is a small Christmas ornament. We printed out the ET face, glued it on a foam board and attached it to a large popsicle stick.
More stories we think you'll LOVE:
- 2024 Guide: Pumpkin Patches, Corn Mazes, Halloween Events and MORE in Tampa Bay
- Scenic Road Trips from Tampa Bay to Experience the Vibrant Colors of the Fall Season
- Halloween Inspired Lunchbox Ideas with Jenny P of @luncboxmafia
- Our Favorite Ghoulishly Good Halloween Jokes for Kids